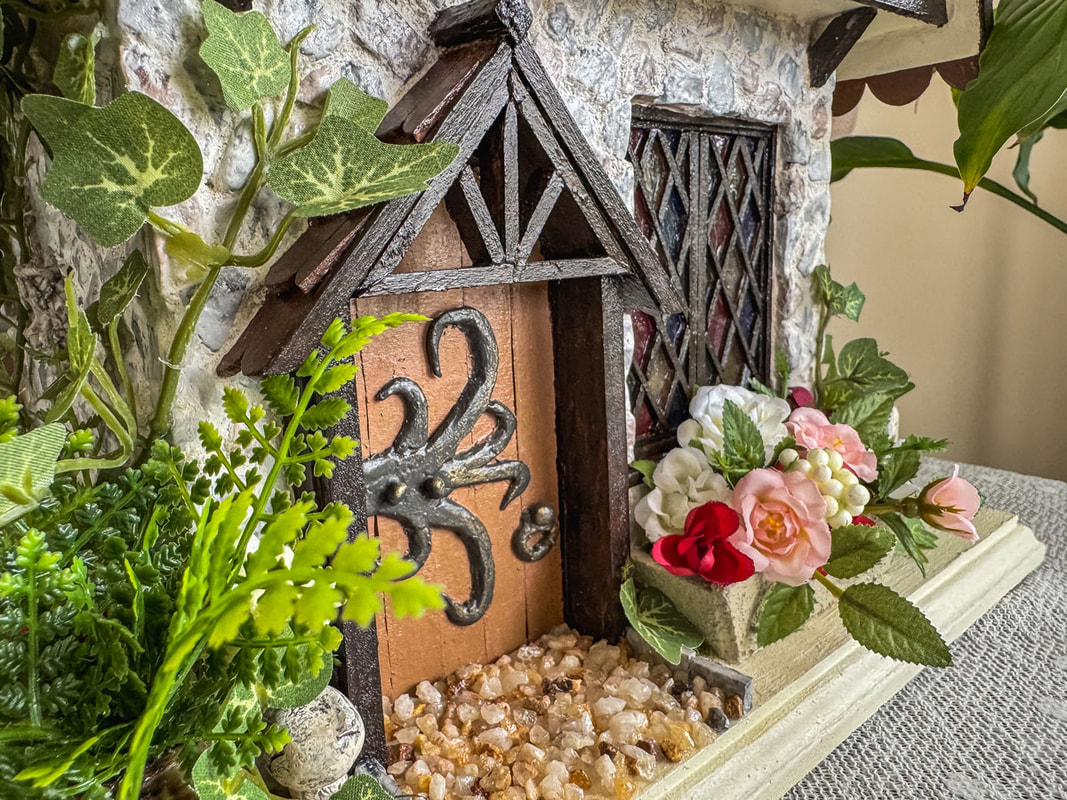
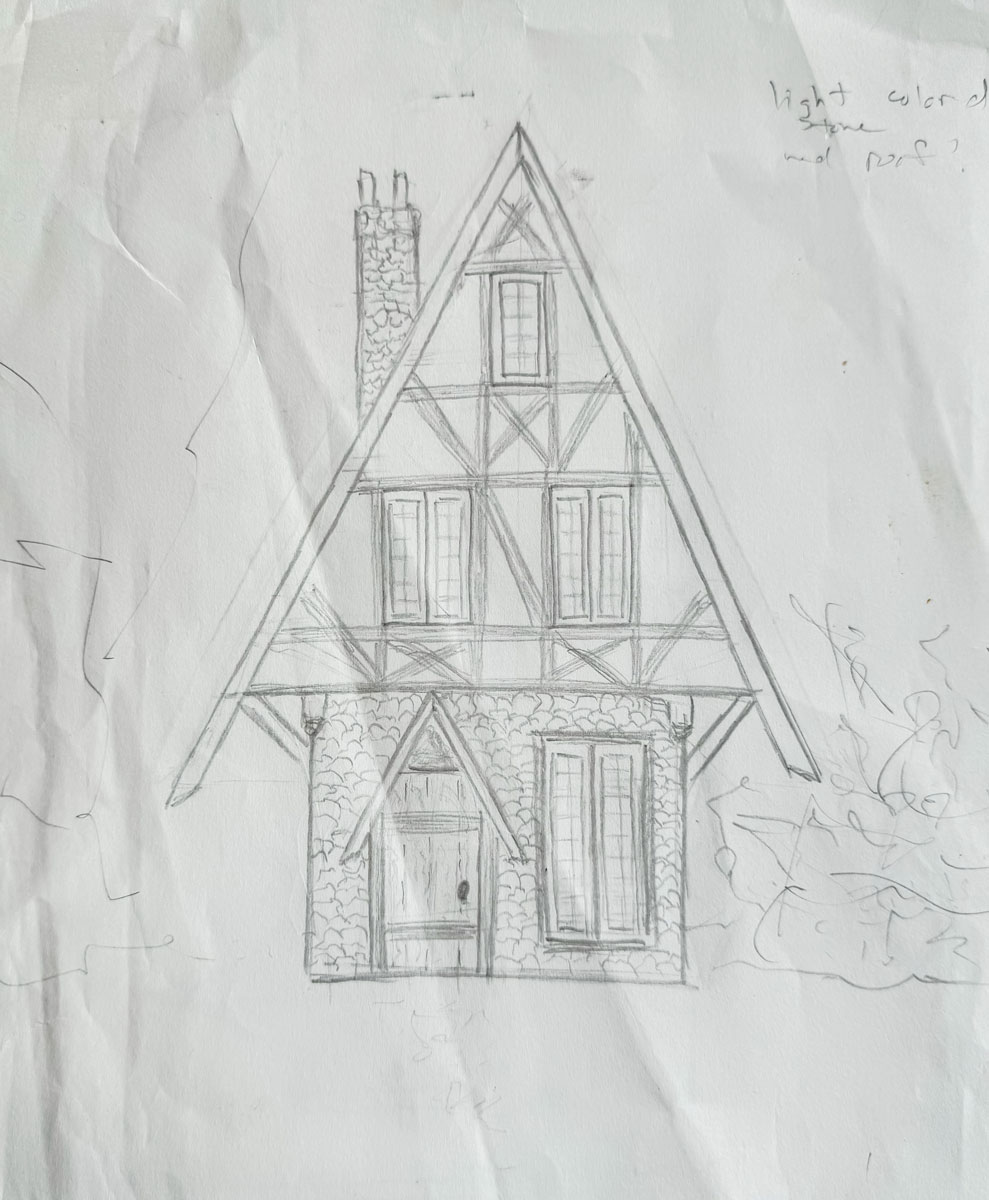
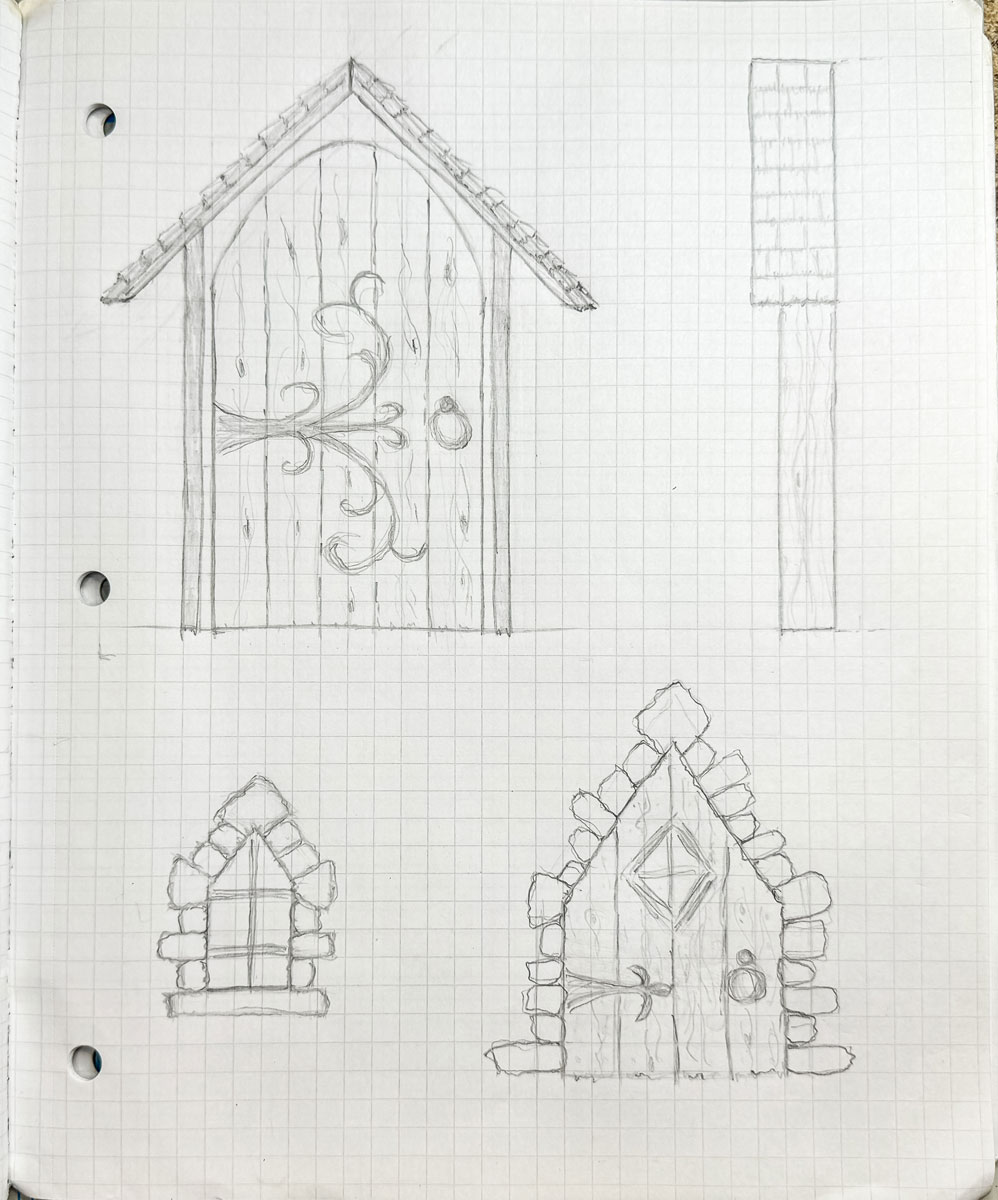
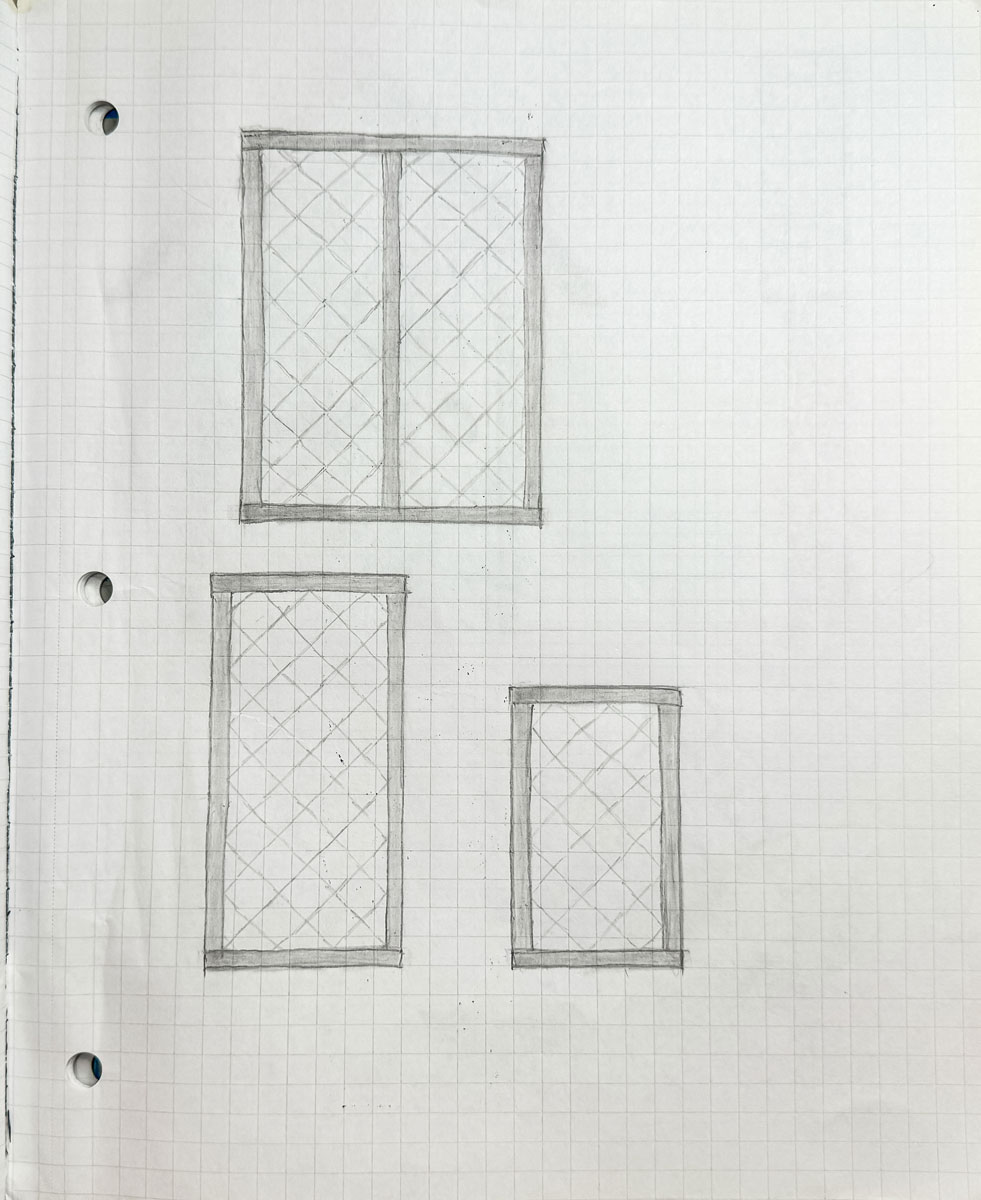
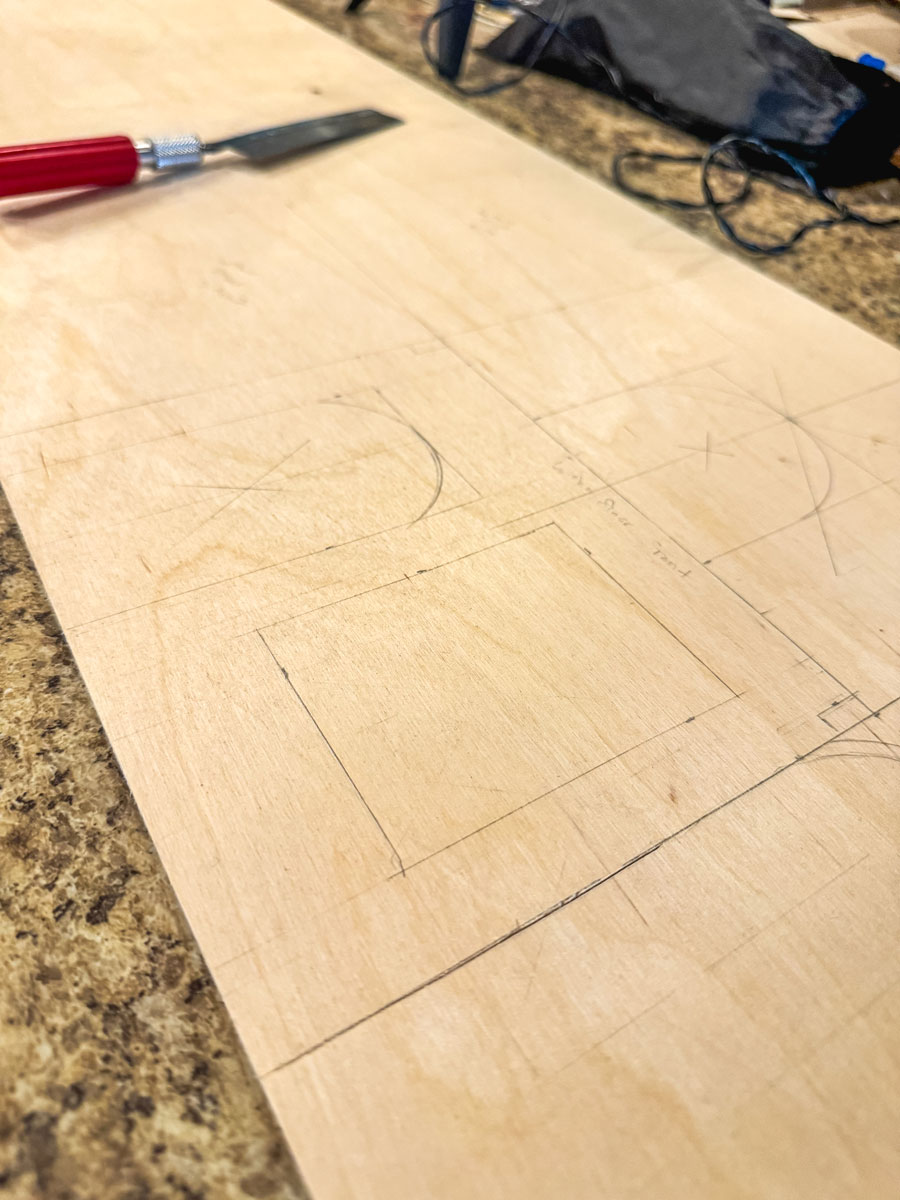
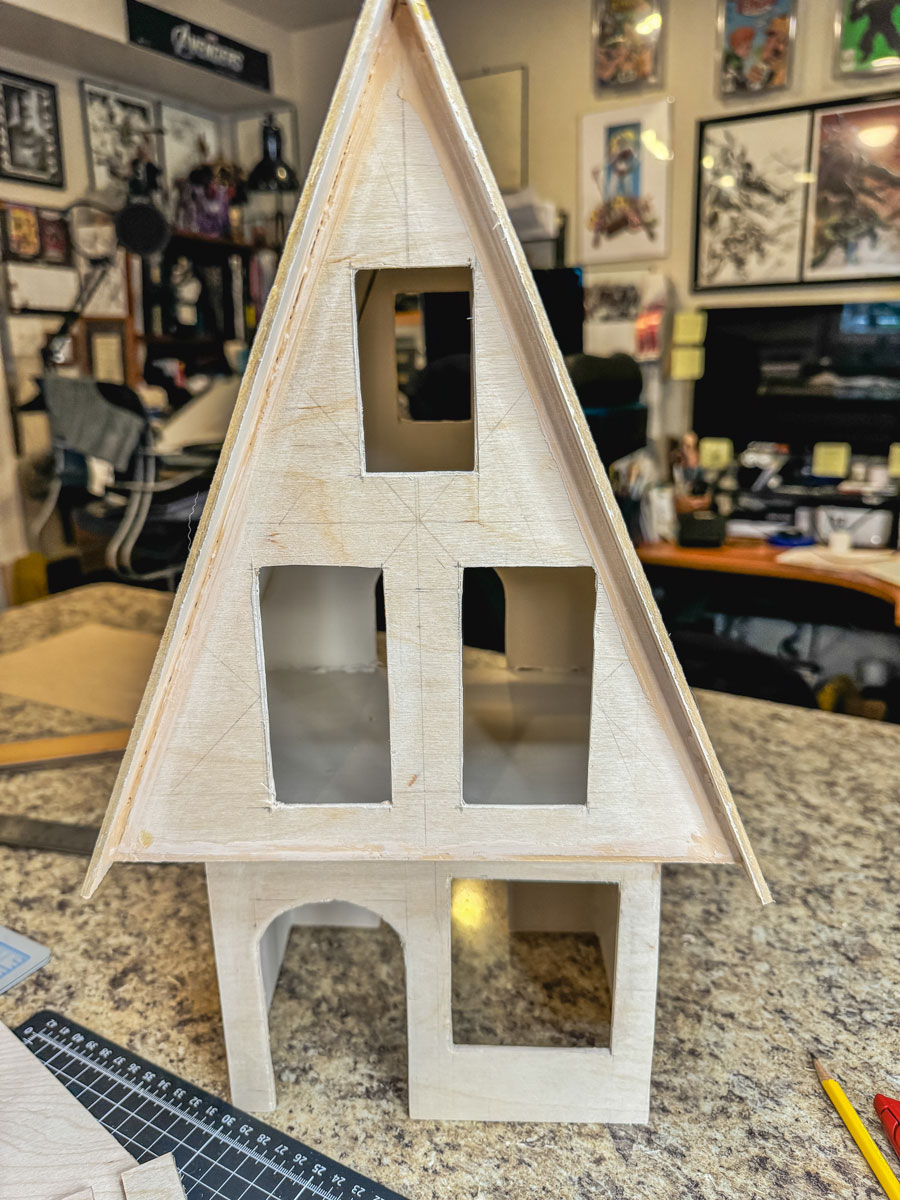
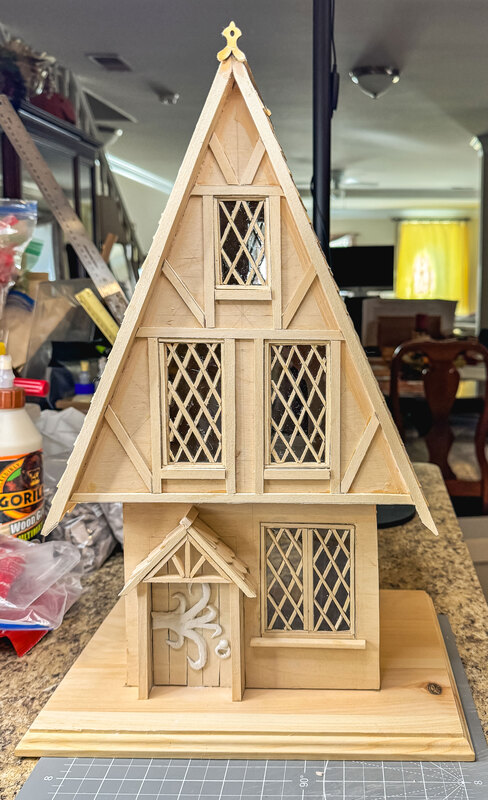
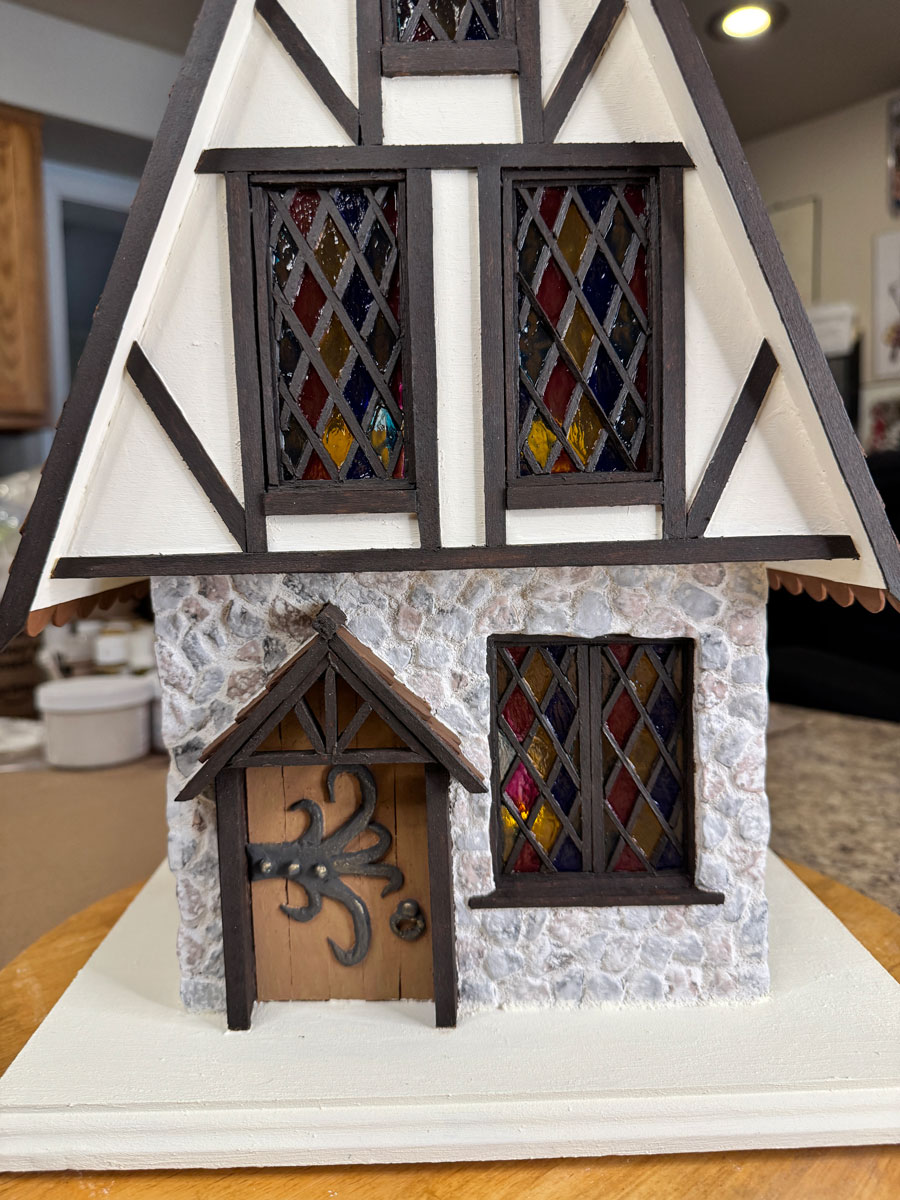
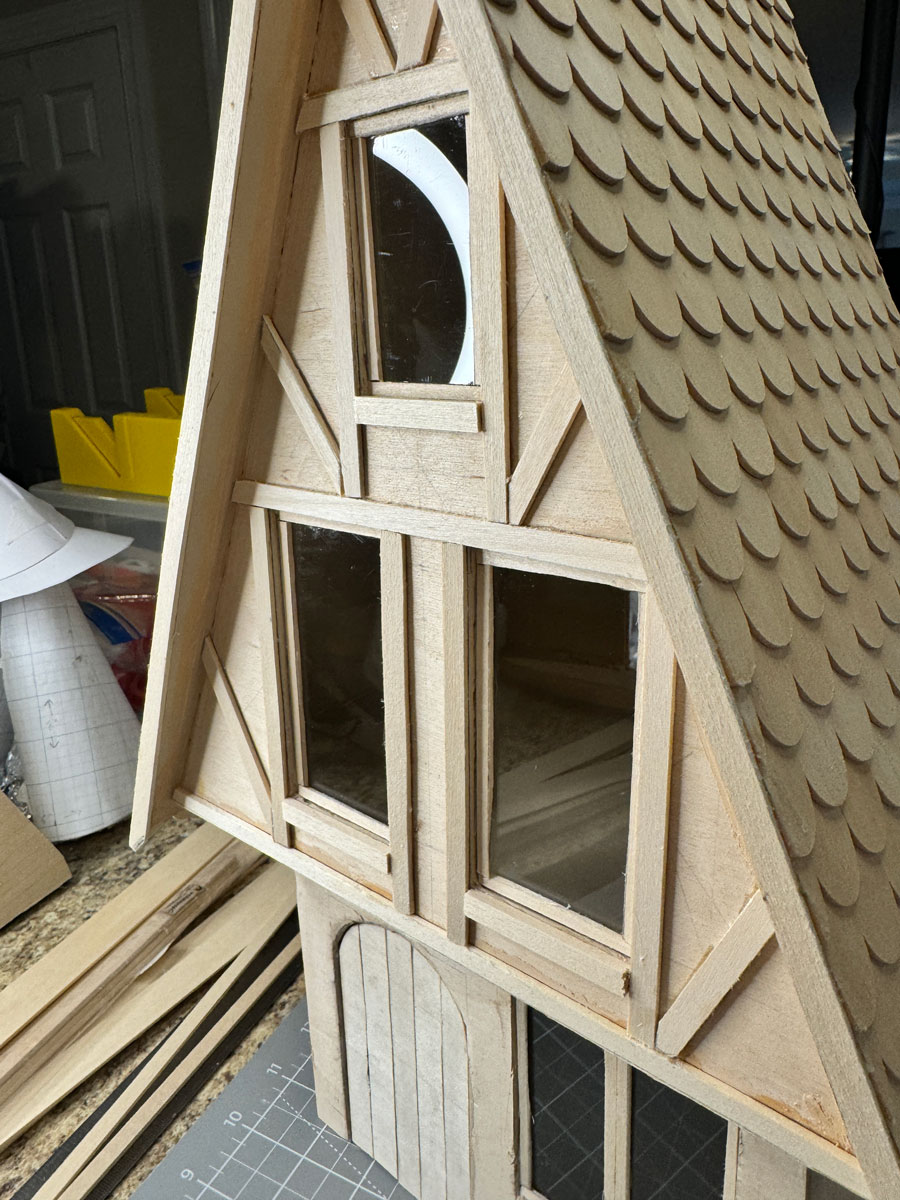
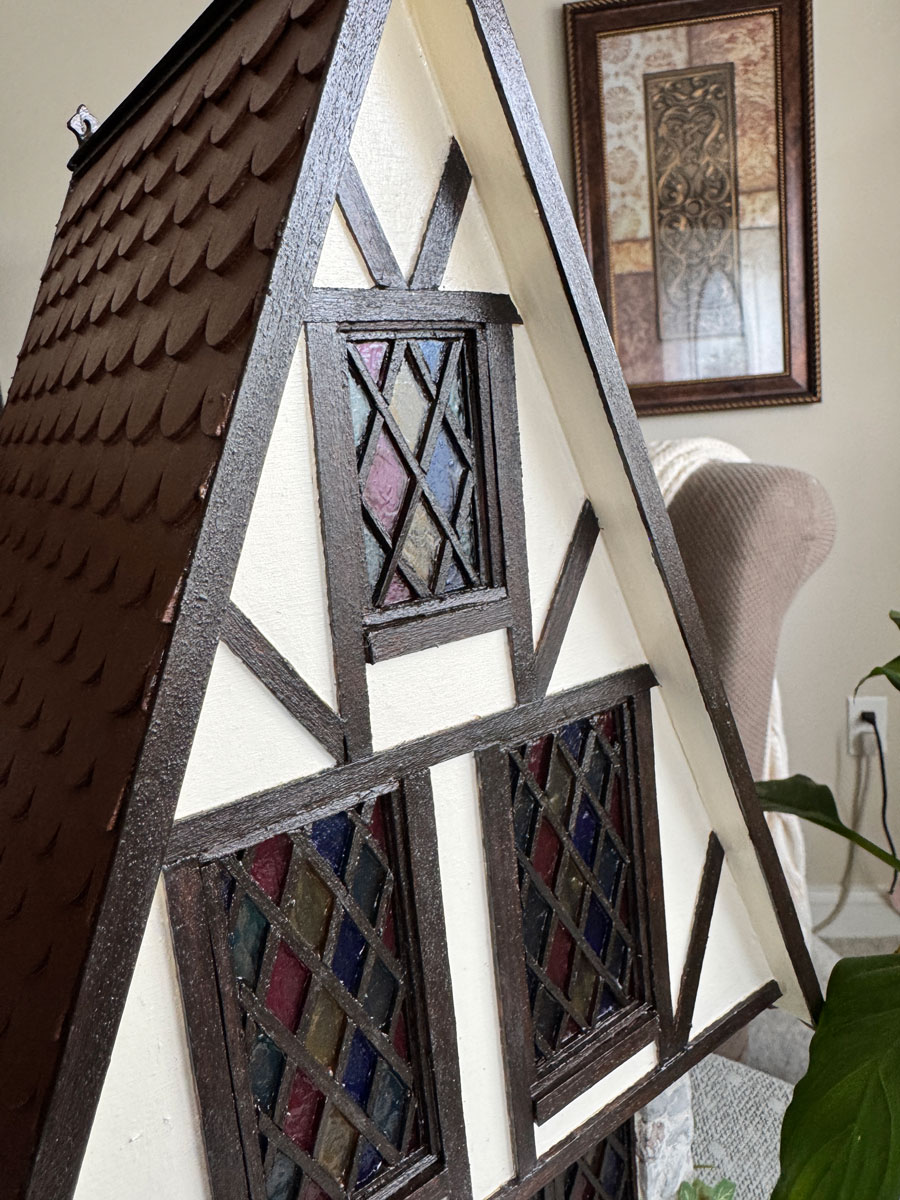
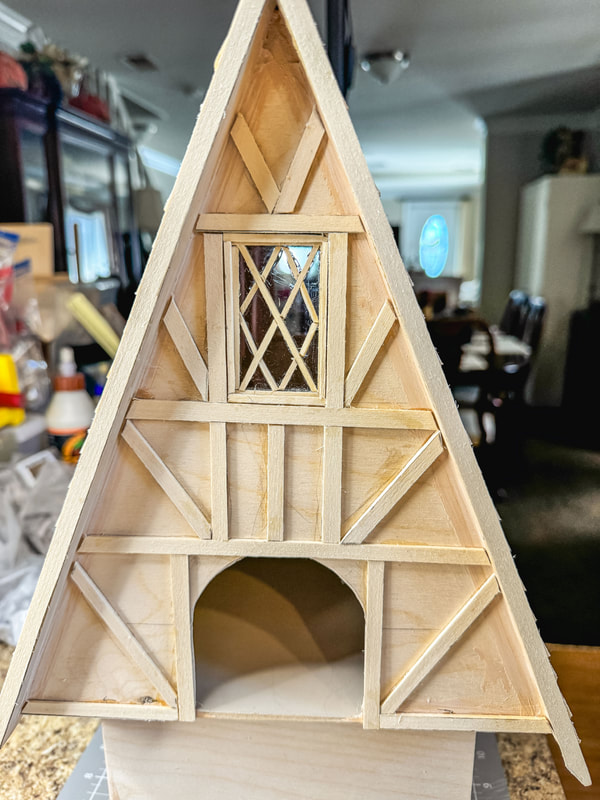
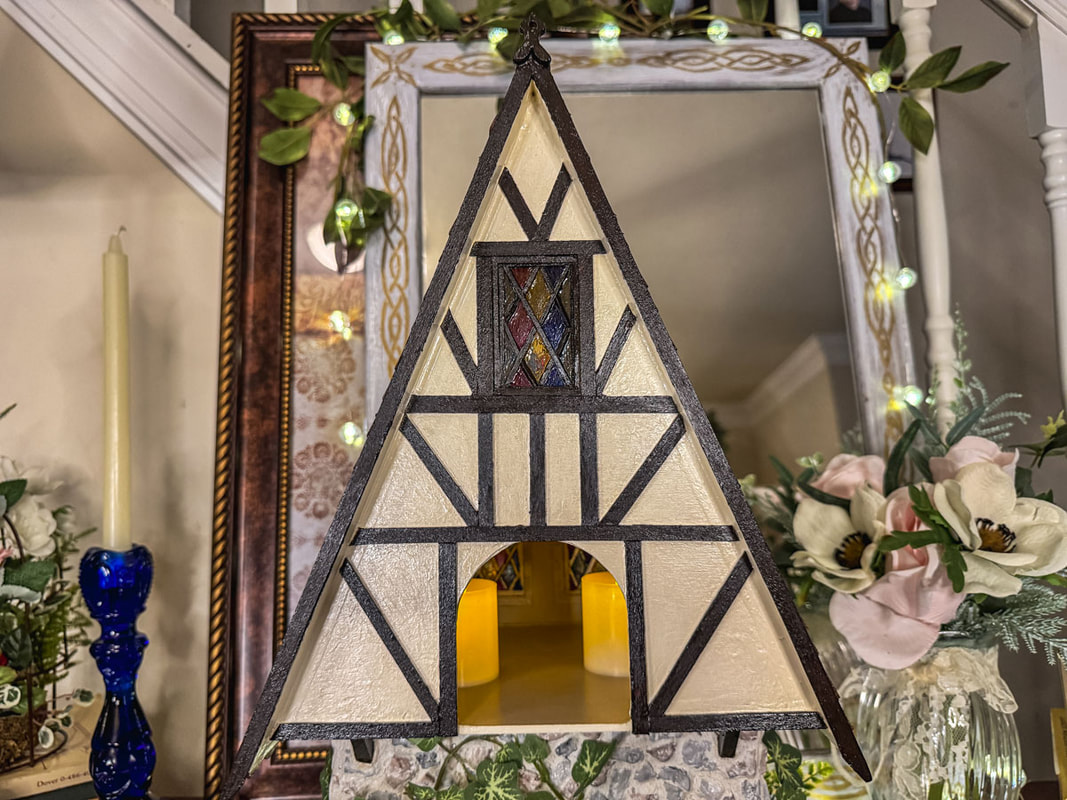
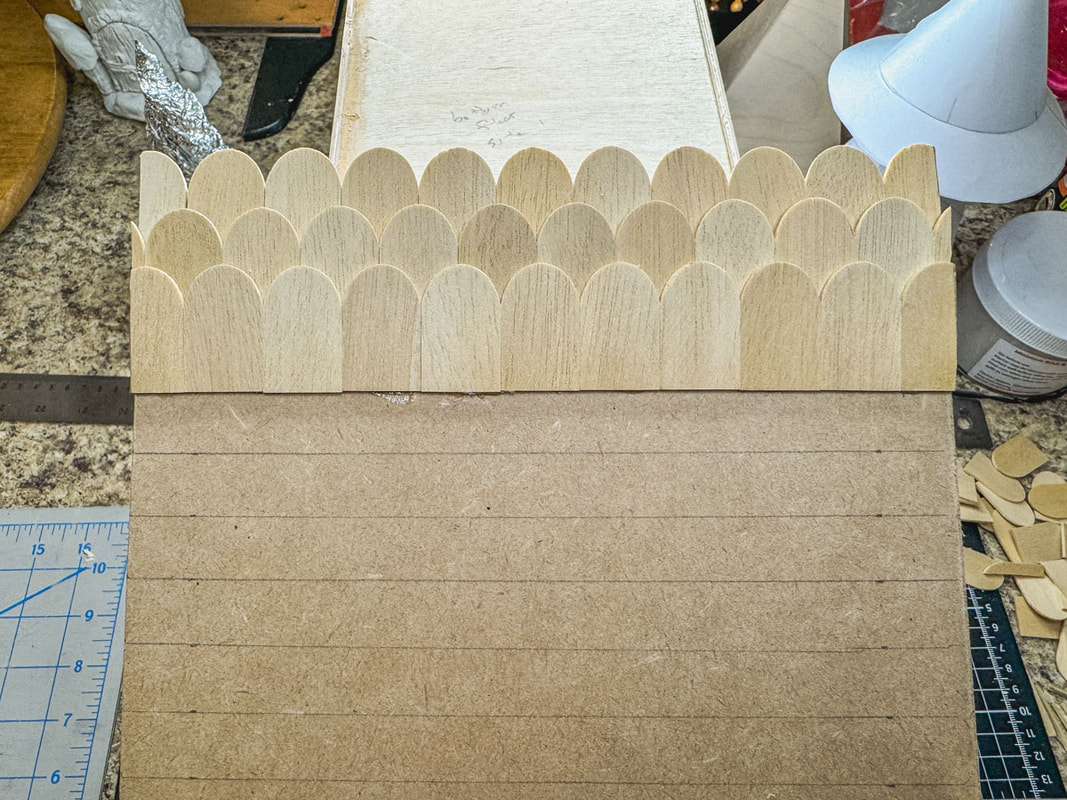
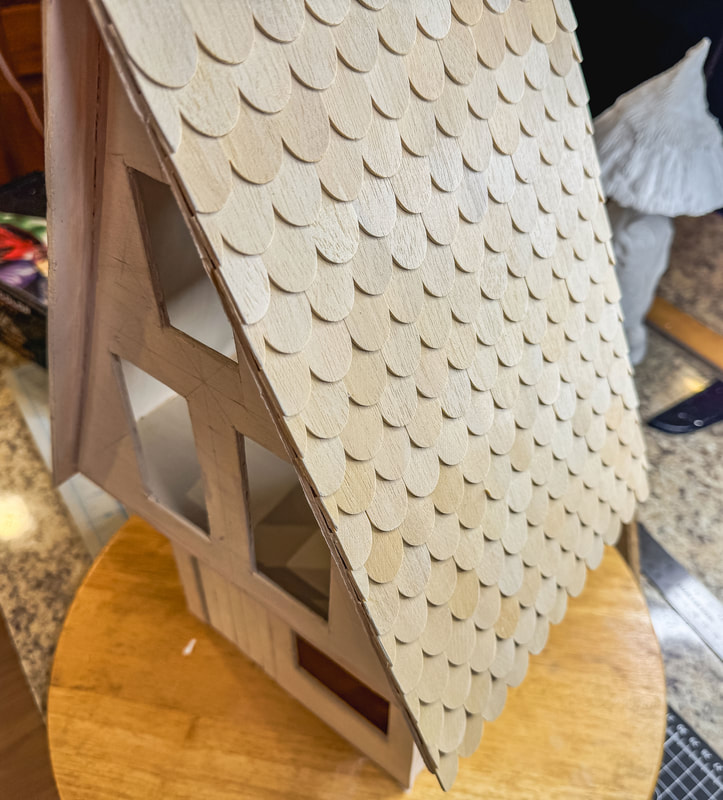
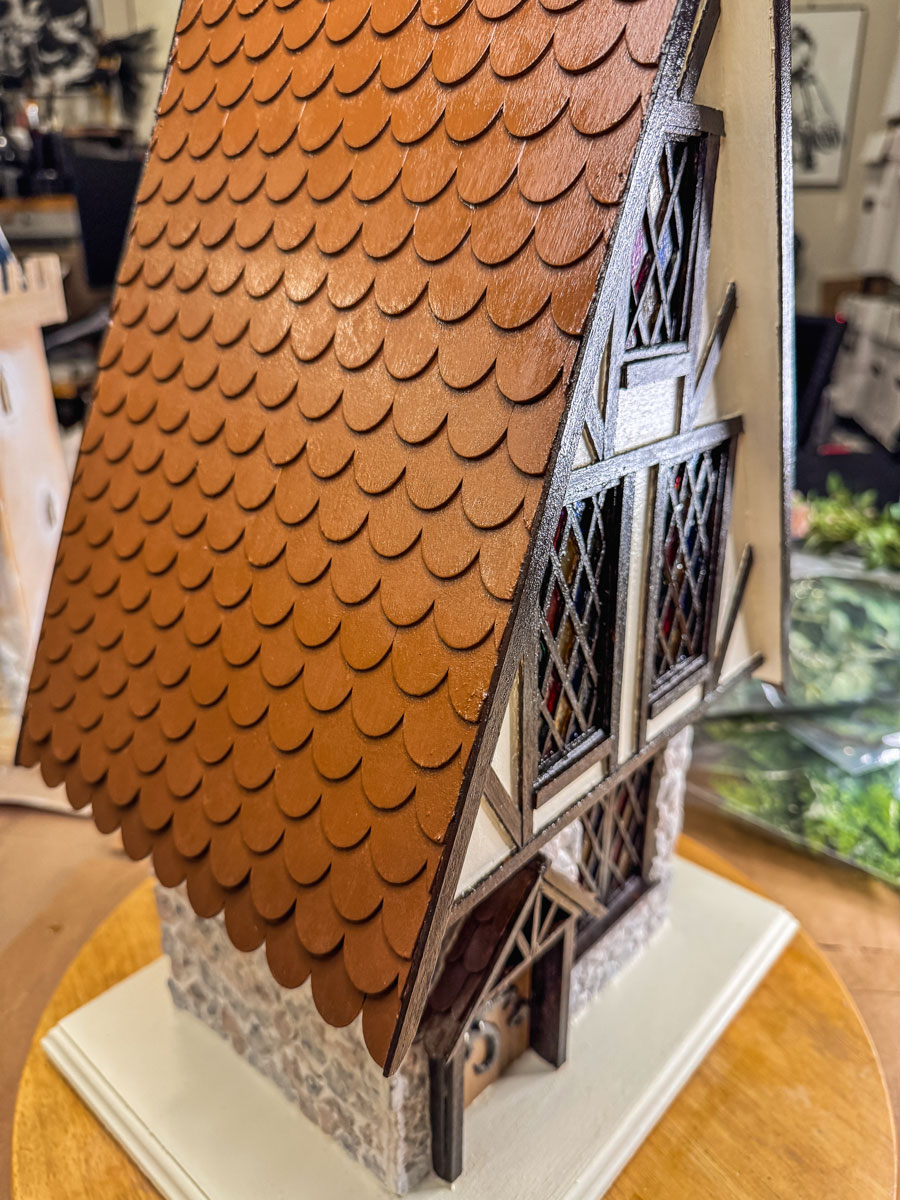
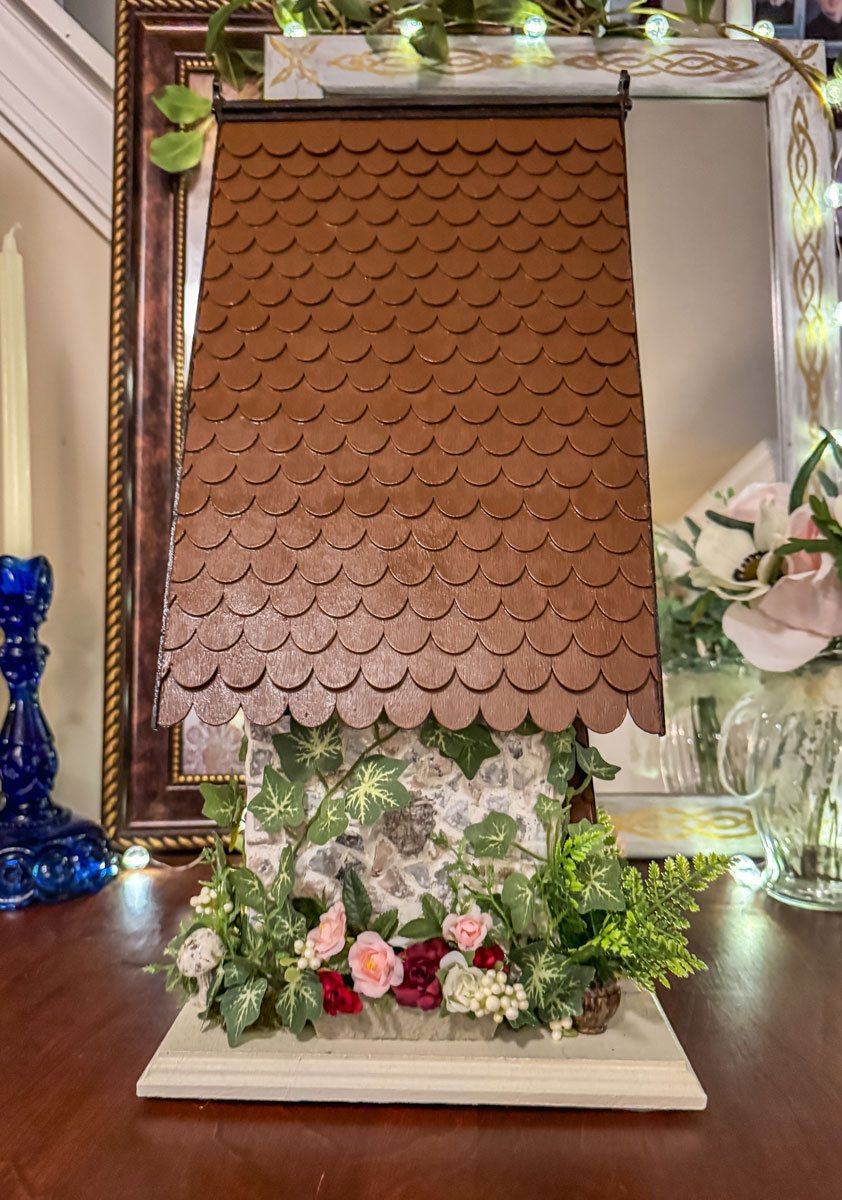
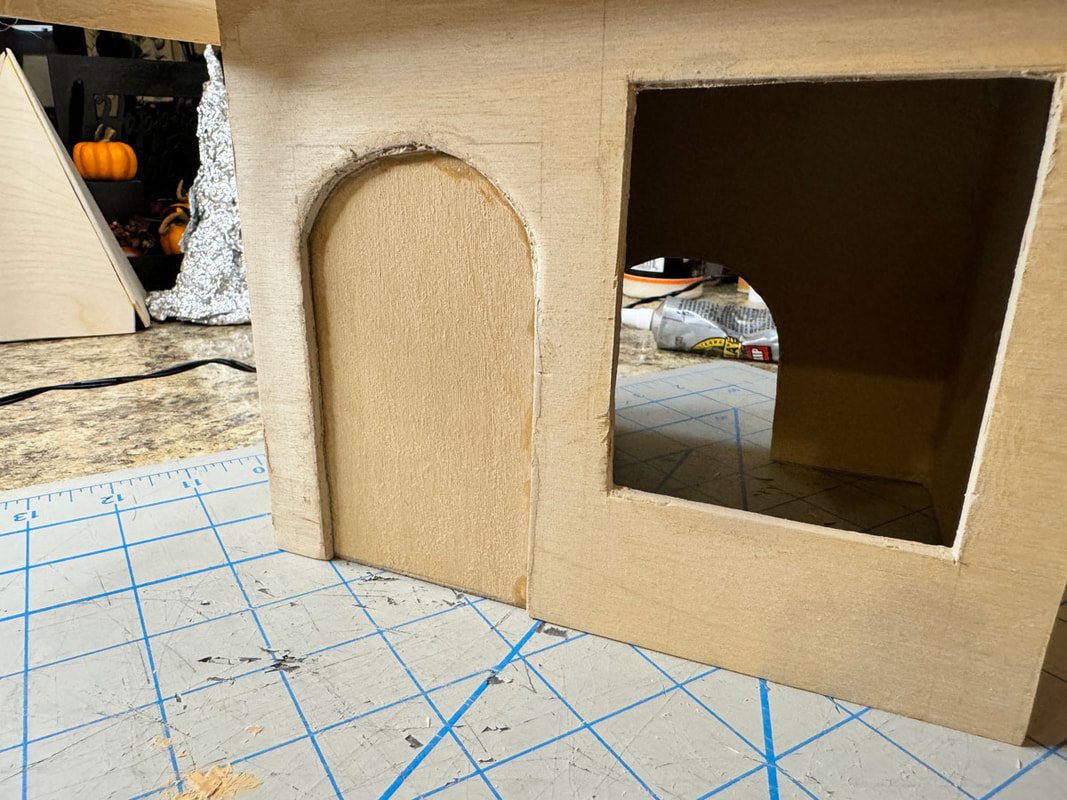
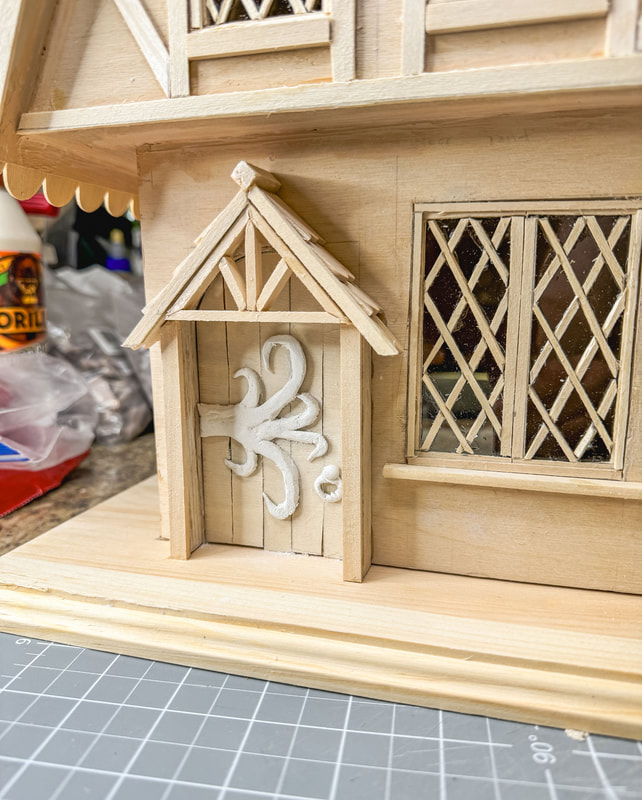
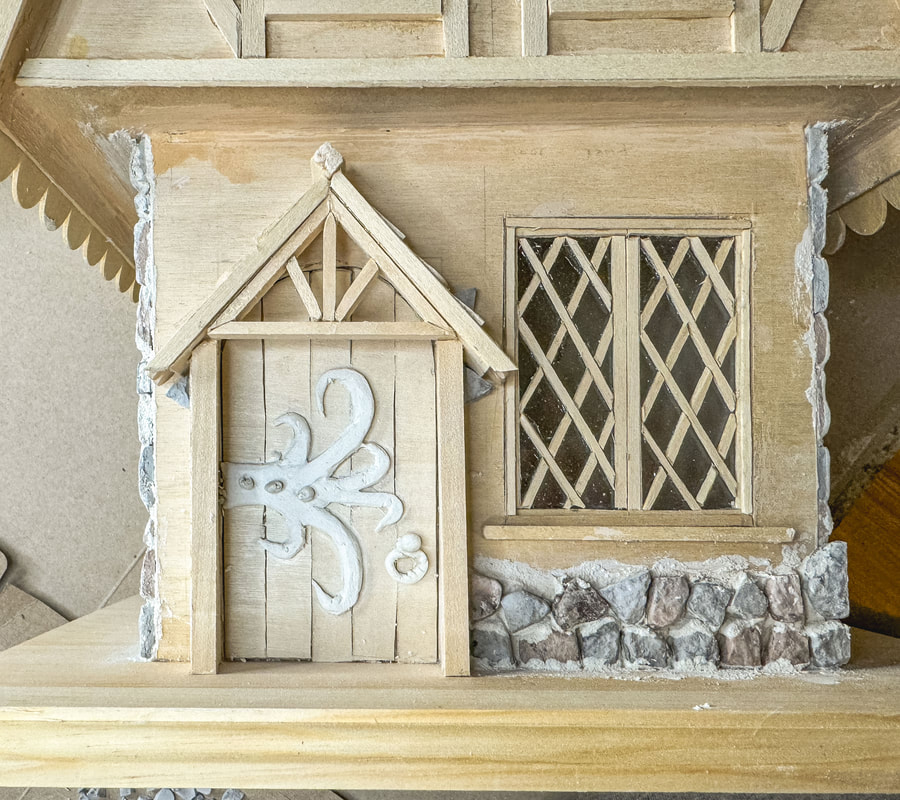
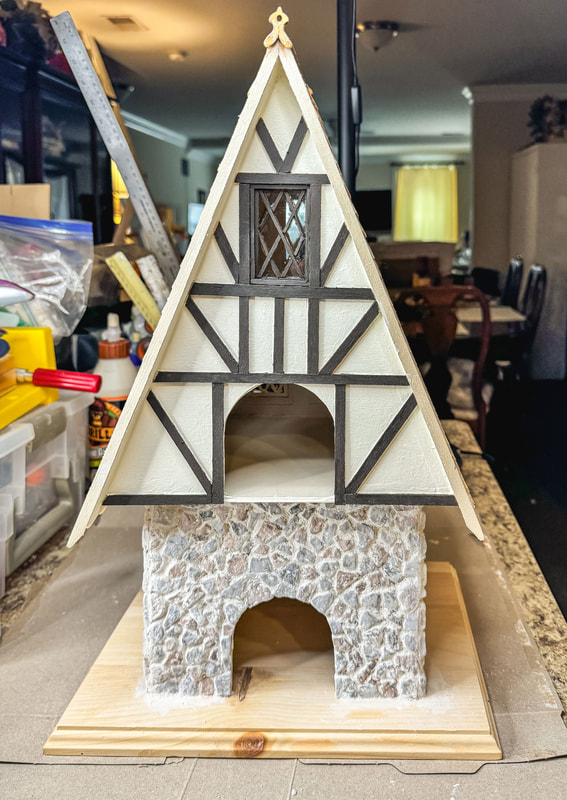
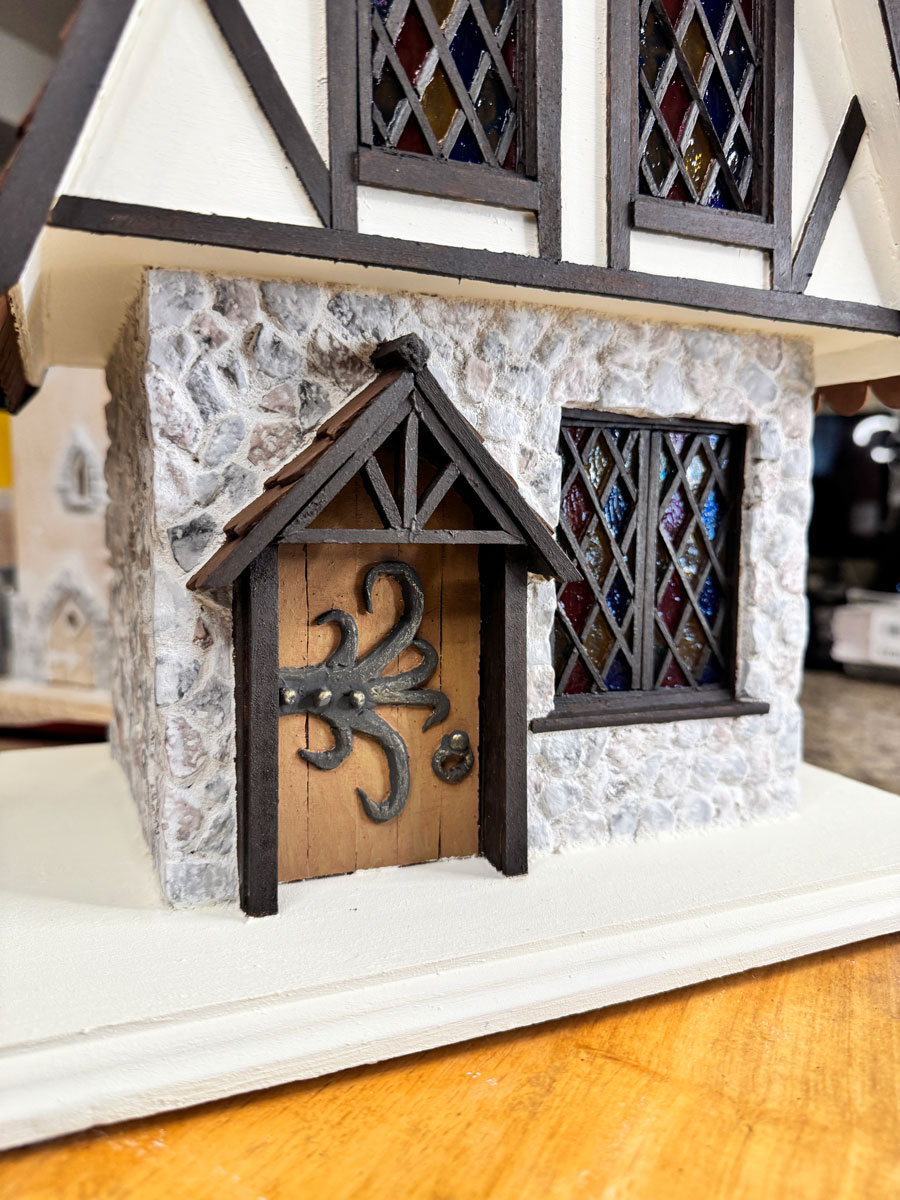
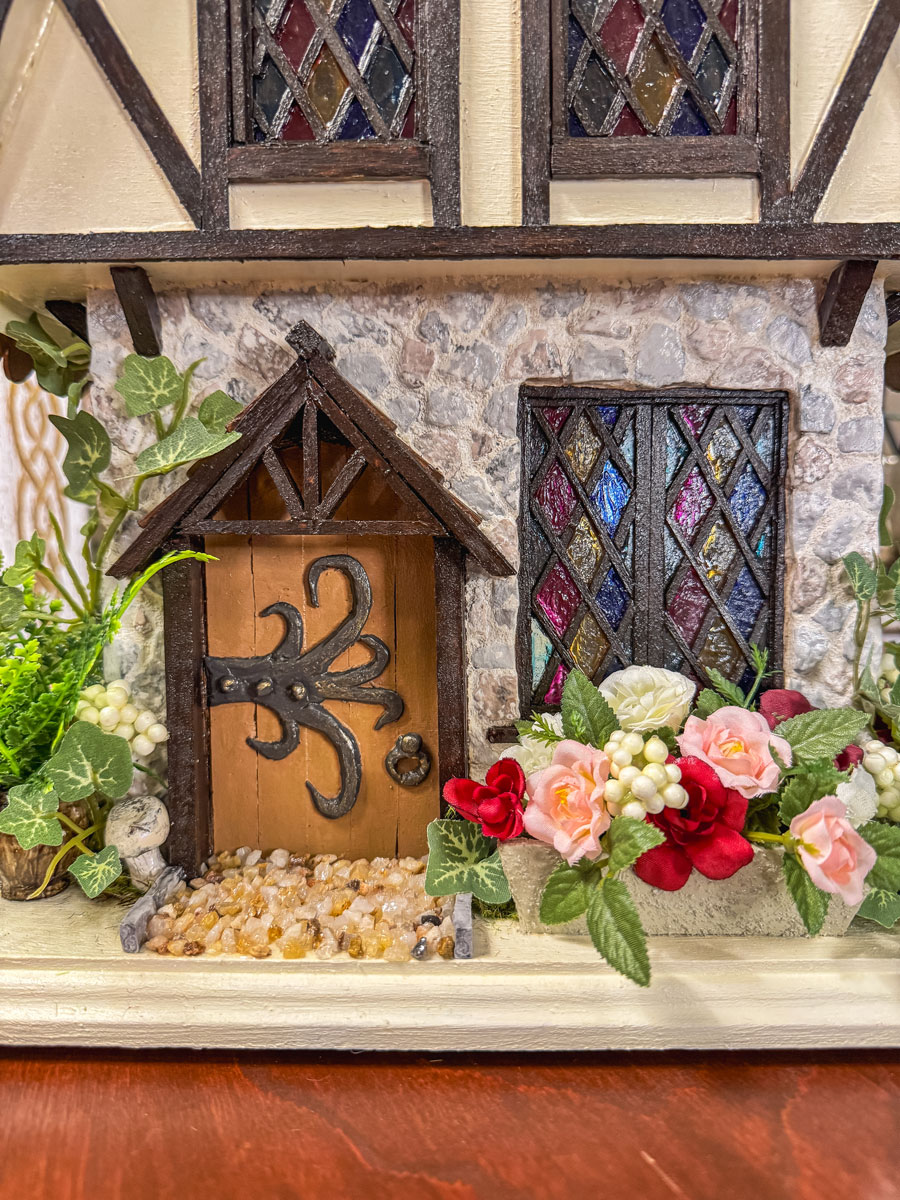
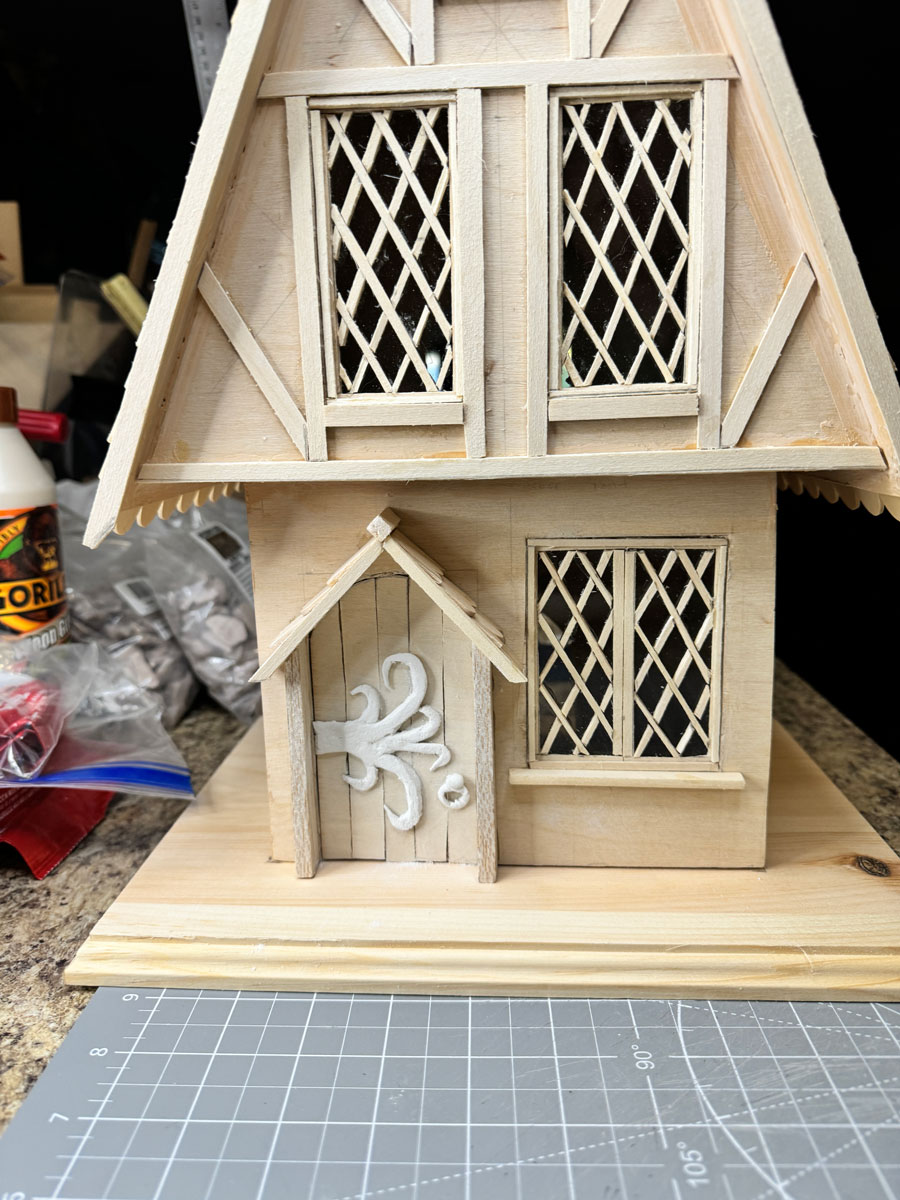
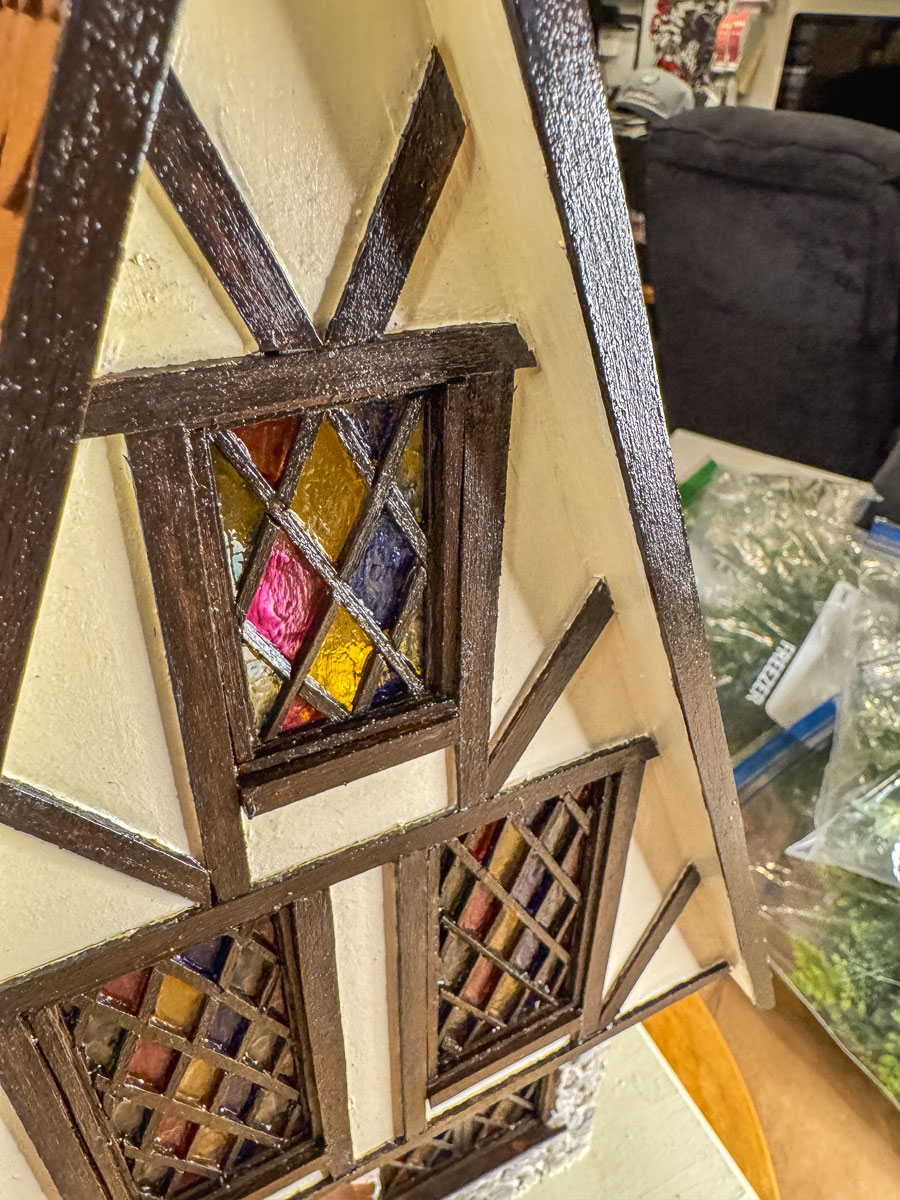
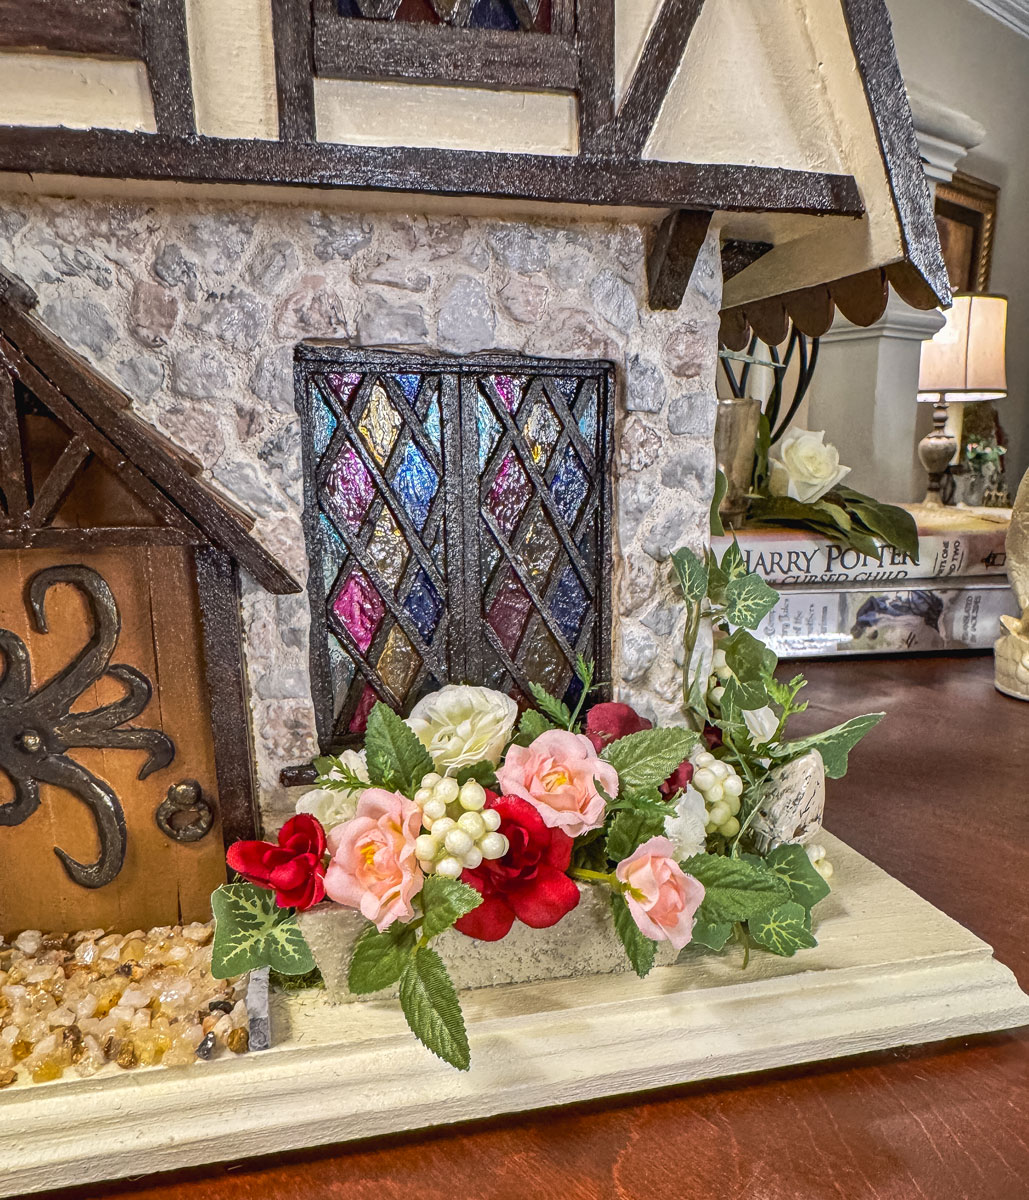
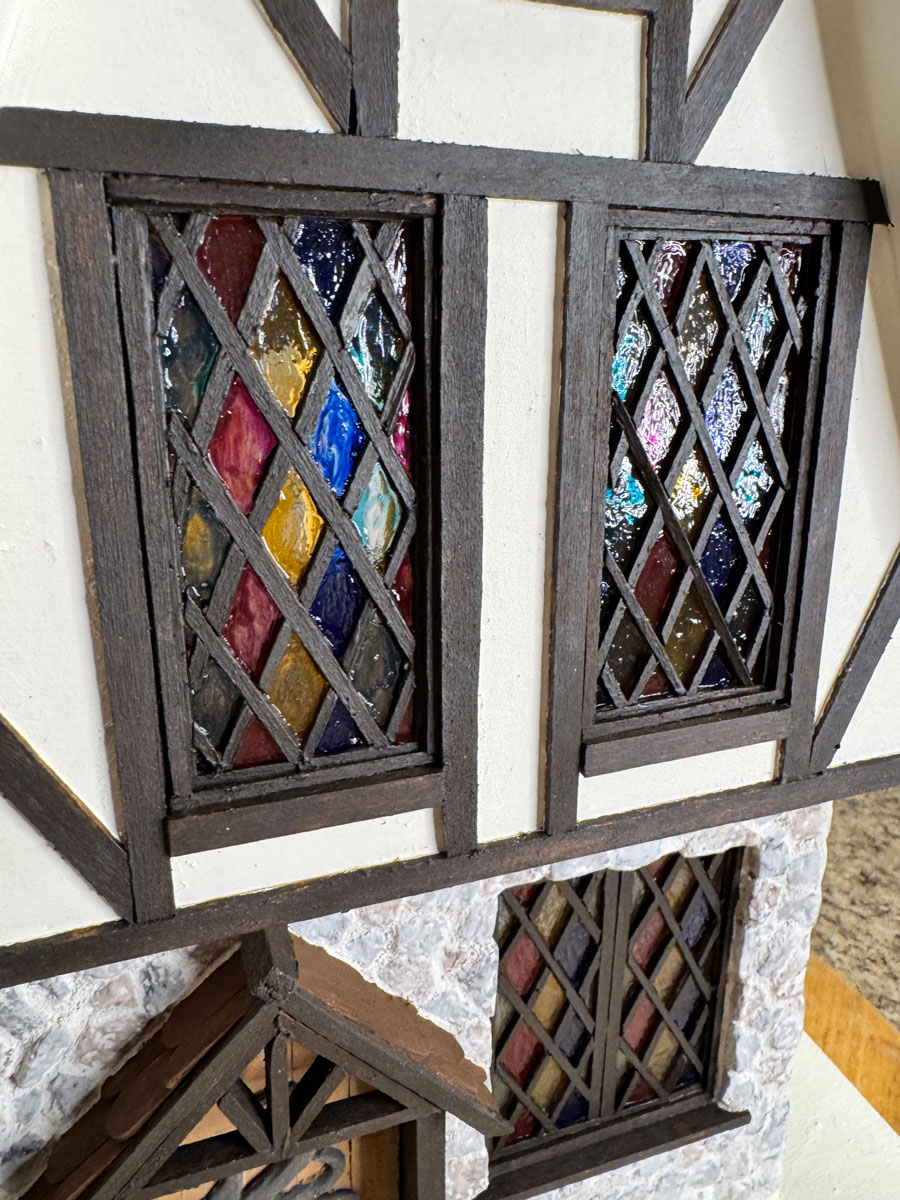
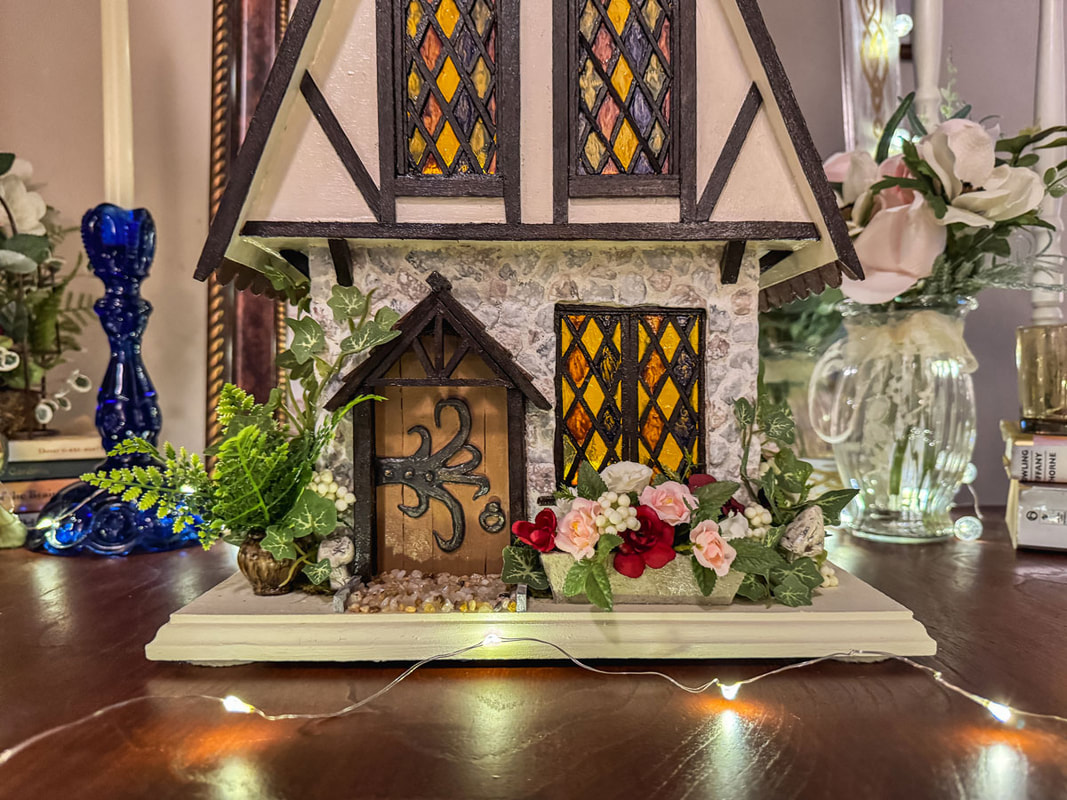
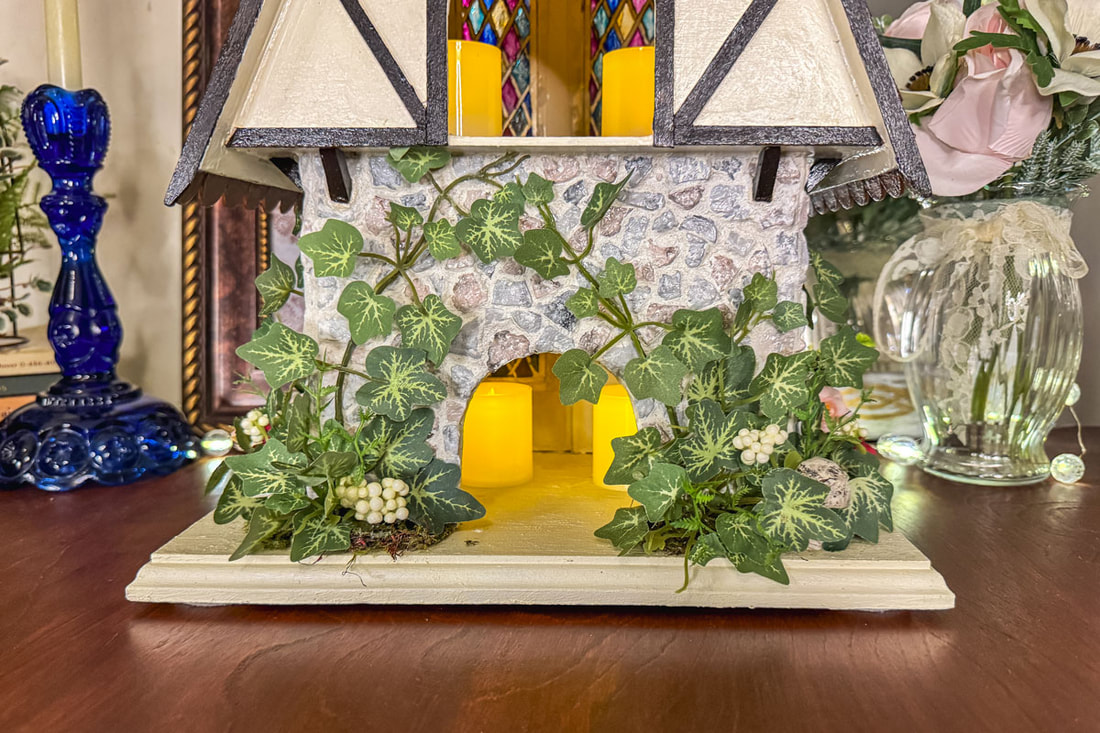
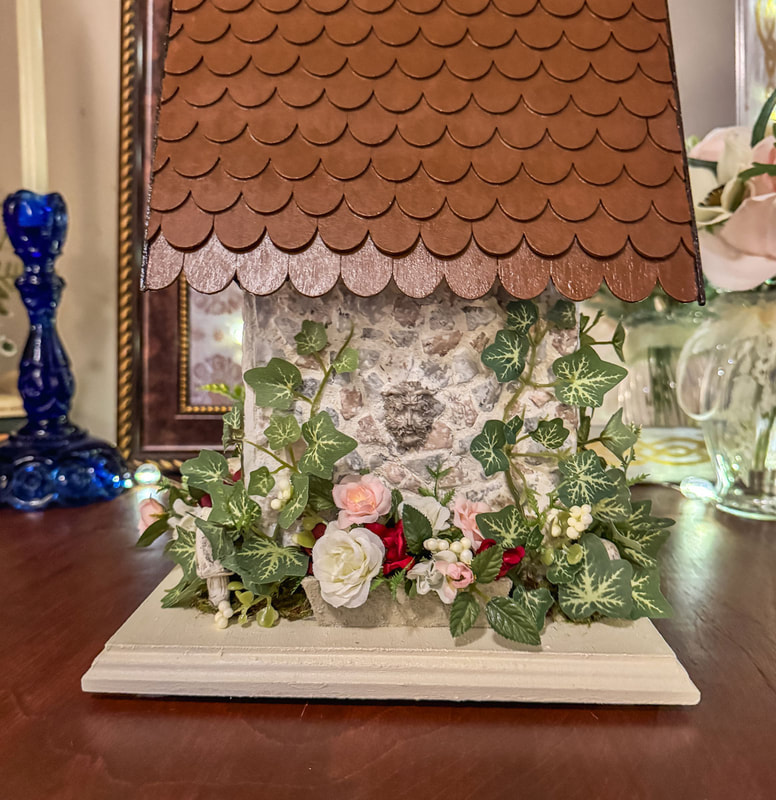
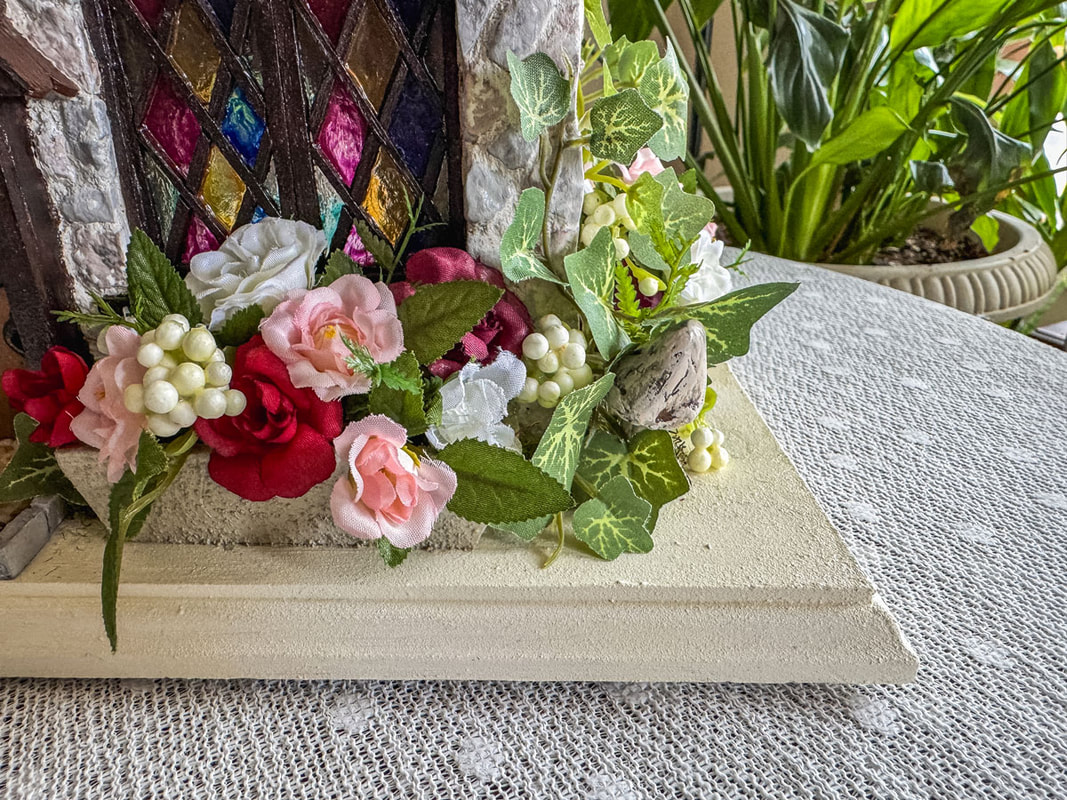
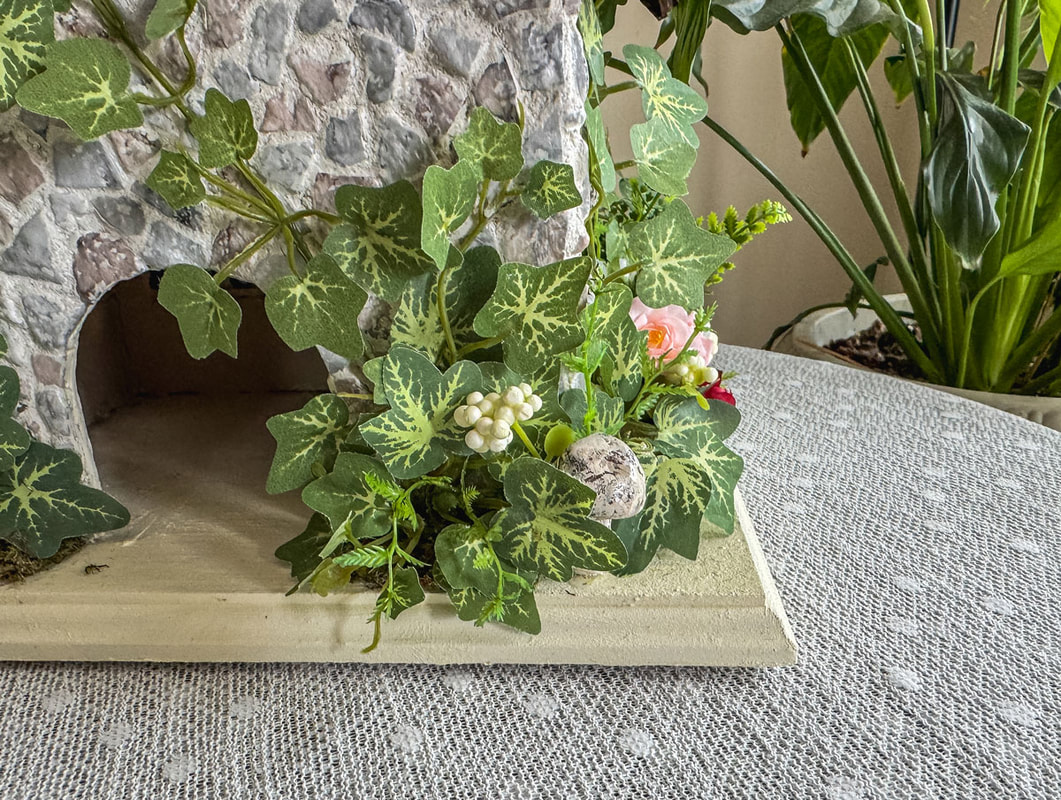
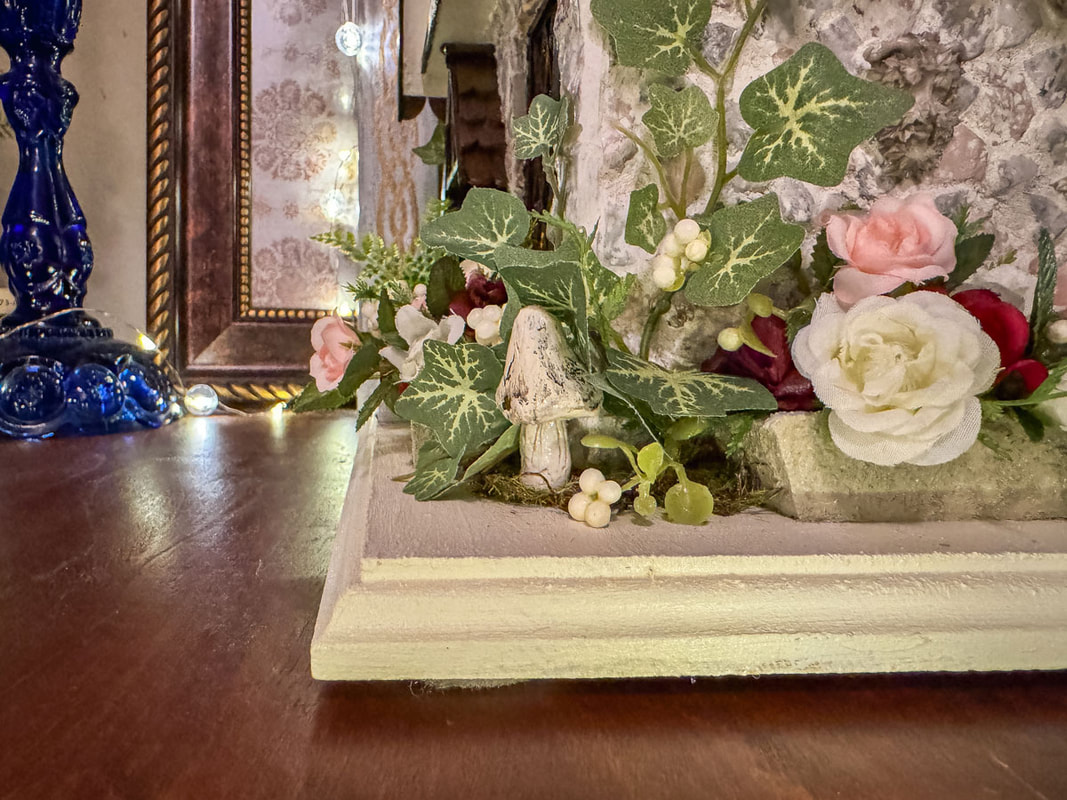
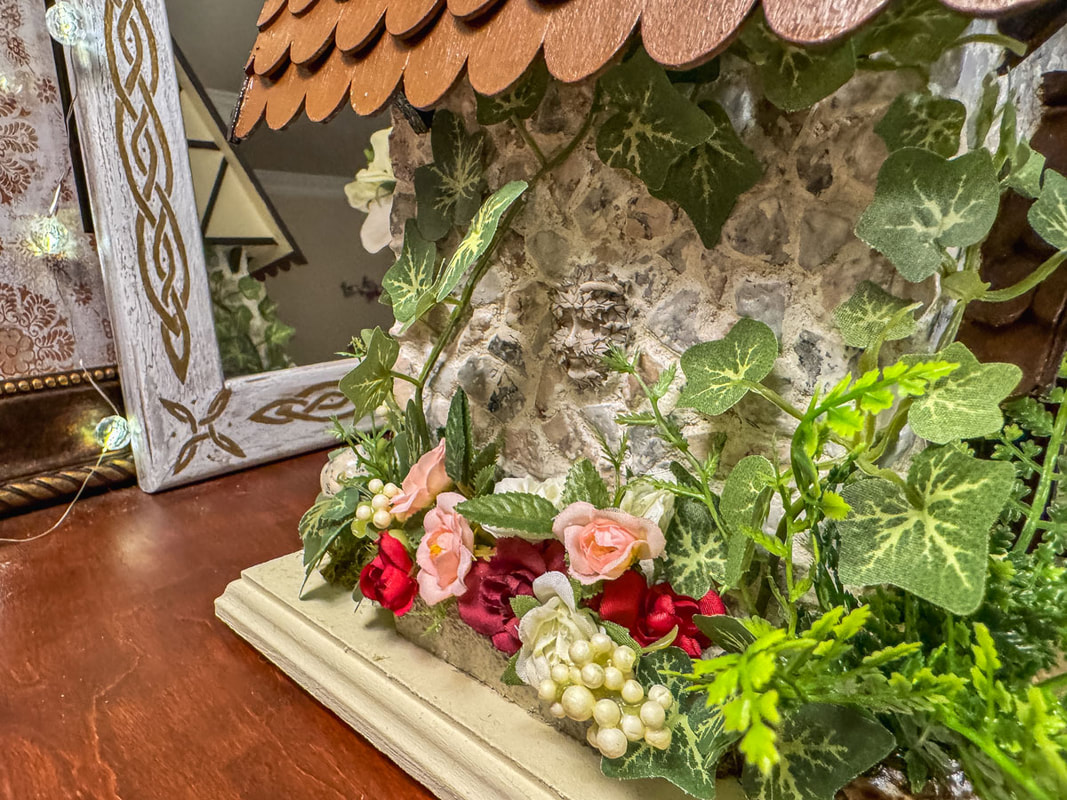
 Whoever thought I’d build a miniature medieval house? I certainly never did…But, I did it! A few years ago, I had an idea for a half-timbered-style house. (How very ambitious of me!) A few sketches were made, and then nothing…for a couple of years. Last year, I finally dusted off the idea, reworked the drawings, and set to work building a stylish medieval home for my resident fairy. The Inspiration for this design came from images of half-timbered buildings from places like England, France, and Germany. Photos of The Shambles (an iconic street in York, England) provided plenty of fodder for my imagination. Today, I’m sharing a behind-the-scenes look at my design process and materials used to create this newest handcrafted fairy house! 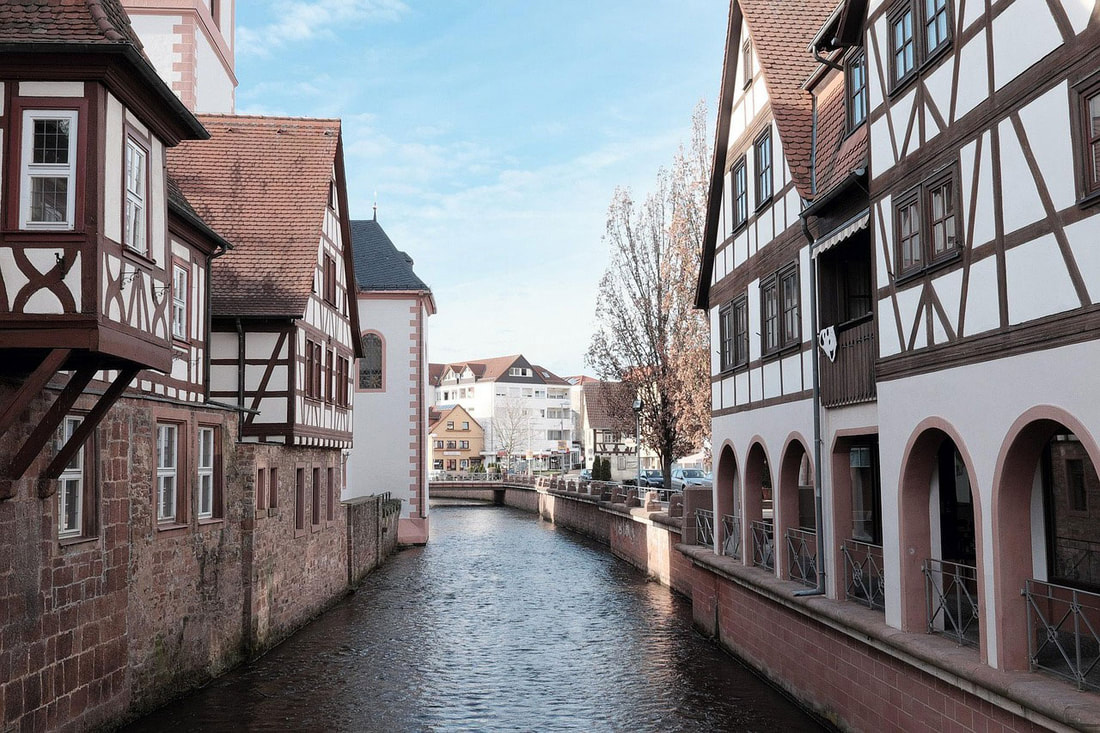 Half-timbered buildings in Germany by wearaway on Pixabay. Affiliate Disclaimer: I am an affiliate associate of Amazon, Factory Direct Craft, and Blick Art Materials, so some of the posts in this article contain affiliate links. If you click on the link and purchase the item, I will receive an affiliate commission at no extra cost to you. I will only recommend products or services I use personally and/or believe will add value to my readers, so there is no conflict of interest. Design concept overview: For this magical miniature house, I envisioned an A-frame top story, with a dramatic peaked roof, sitting atop a stone veneer ground floor. The house structure itself is constructed with a mixture of birch, basswood, MDF, and balsa wood. The diamond pane windows (made with tiny pieces of balsa) were initially supposed to look like plain glass. At one point, I considered creating a frosted look, but after some experimentation, I decided on a more whimsical look using multi-colored stained glass. Surprisingly, the initial design concept stayed pretty much intact, with only a few minor details added. I even kept the warm color palette, especially on the upper floor. Roof and top floor construction: As previously mentioned, the design for this house centers around an A-frame roof, its boards cut at a steep angle for maximum drama. Overlapping layers of scalloped shingles (see that tutorial blog here or watch the video here)—painted in Cinnamon Brown acrylic—are framed by a dark Burnt Umber roof ridge, apex, and fascia boards for contrast. The front and back facades carry over the dark brown color in the timber and window sashes, which are themselves contrasted against walls painted with Vintage White acrylic. I spent an obnoxious amount of time studying a wide variety of medieval windows and half-timber designs so I could build a convincing miniature version! Bottom floor and door construction: The bottom floor was envisioned to be made of (or lined with) stone, as seen in some ancient medieval buildings and modern renderings of those building styles. I was absolutely fixated on this detail! To bring it to life, I used Brown Cut Fieldstone and Grey Cut Fieldstone—stone veneers for dollhouses—held in place with white cement mortar. Sounds simple enough, but it was quite a task, let me tell you! The rest of the front facade wasn’t much easier! A large window matches the diamond-style stained-glass panes of the top-story windows to create a sense of continuity. Next to that window is a wooden door (constructed with popsicle sticks and painted in Country Maple brown acrylic) covered by a shingled portico painted in the same Cinnamon Brown and Burnt Umber as the main roof. I used air-dry clay to create the vine-like metal hinge and door knocker, and painted them Deep Grey with gold acrylic highlights for a metallic look. Window design: The windows took WAY longer to build and paint than I ever thought possible! There was nothing simple or quick about this process, with all of its mind-numbing details! But here’s the cliff notes… The window glass is made from plexiglass cut to fit each window. Tiny pieces of balsa wood were cut and glued into place to create the diamond-pane window pattern. Each diamond was then painted with stained glass paint, varying the colors for a whimsical effect. The window sashes were built out with basswood strips, mimicking the style of some real-life half-timbered and medieval windows. All of the wood window details were painted the same Burnt Umber as that on the facade timbers and roof details. Planters: After putting so much time and effort into the rest of the house’s details, the platform felt a bit empty. So I decided to add planters to help fill the space and provide a decorative way to display my faux florals (which I’ll discuss more in the next section). At first, I wanted to buy pre-made planters off Etsy, Amazon, or another online shop catering to miniatures, but I couldn’t find the right style and size. (I’m very picky!) That led me to designing and building them myself, because…well…Why not?! I measured and drew out a very complex design, which was very pretty but a little over the top for this project. The final planter boxes (made with basswood) are simple and utilitarian, the vine design and lip edge substituted for a Suede acrylic paint with sand added to create a faux stone look. 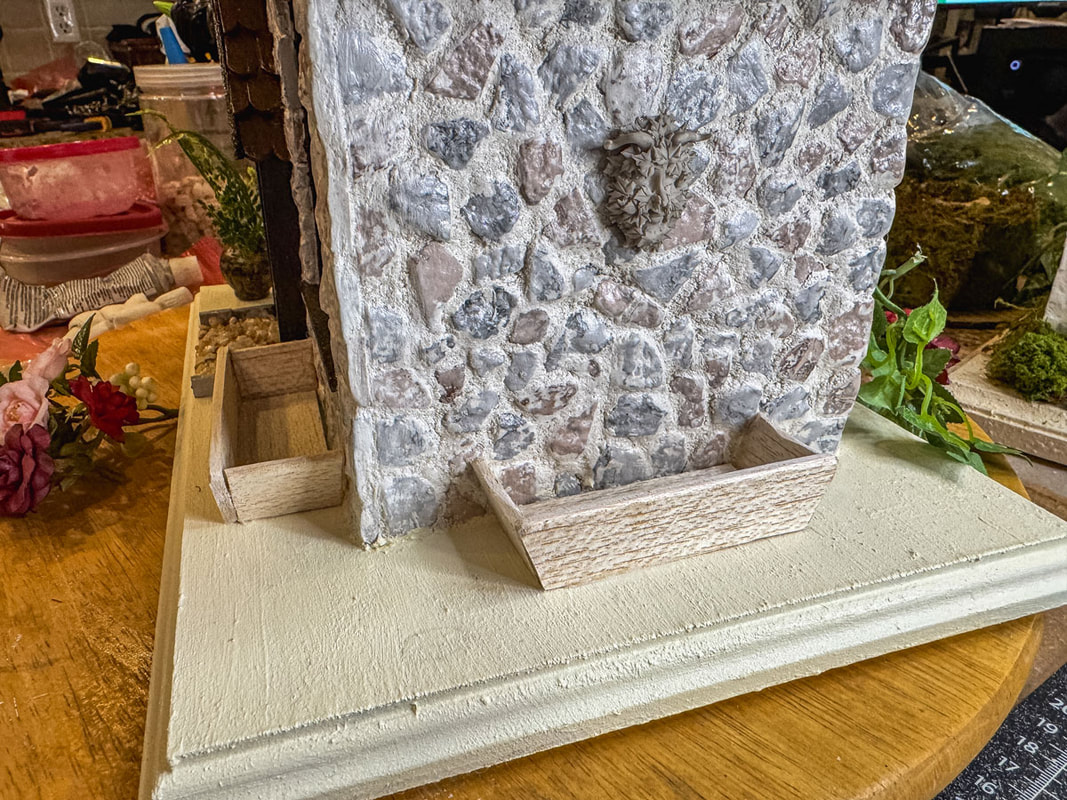 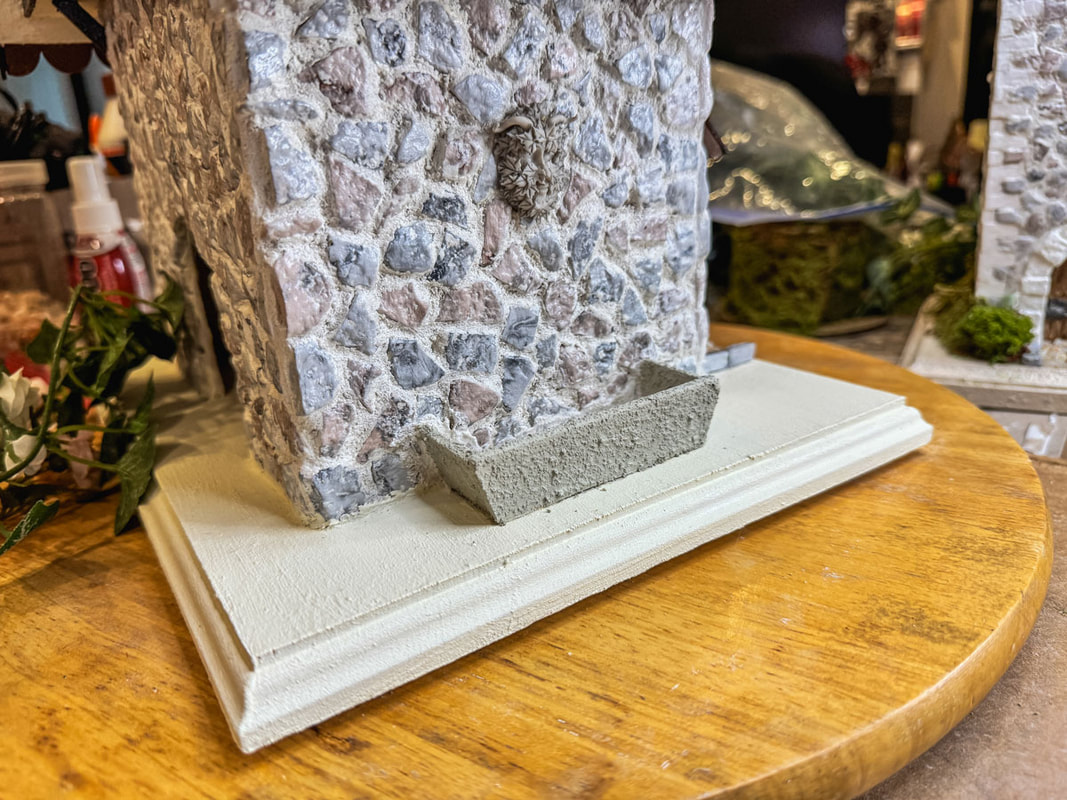 More finishing touches: The finished fairy house—sealed with my favorite go-to low-VOC varnish and attached to a pre-cut wood plaque for a sturdy display—was now ready for its “jewelry”. These accessories include moss (attached to floral foam), a small rustic pot filled with fern sprays, miniature ivy vines (from Hobby Lobby), and miniature fabric roses. I chose a triad of feminine flower colors (red, pink, and white) for an enchanted garden ambiance around the perimeter. On either side of the house—adding an Old World garden feel and a touch of mystical magic—a Green Man face hangs on the stone wall. Handmade miniature mushrooms made with air-dry clay peek out from clusters of verdant ivy leaves to complete the display. (These charming air-dry clay hand-painted mushrooms feature in an upcoming DIY blog and video!) Additional tools and materials used in this project: Would you like to know what other tools and materials I used for this fairy house project? Here’s a quick list below: Enkay Needle File Sets (for sanding small details in wood and clay) Sandpaper (variety of grit) X-Acto Snap-Off Blade WorkPro utility knife Coping saw Midwest Hobby & Craft Super Easy Cutter Excel Craftsman Knives Ludwig Precision 12-inch Aluminum T-square Stainless Steel Metal Ruler Gorilla waterproof wood glue Gorilla Ultimate Super Glue Clear E6000 230010 Craft Adhesive Clear E6000 Adhesive Spray Clear Adtech mini hot glue sticks Dual temp hot glue gun Paint brush set Student clay modeling tools Well, there you have it…The “short” version of this half-timbered fairy house design process! (I’m still recovering from the ordeal!) Just one final detail…fairy lights! I used flickering flameless candles and LED fairy strand lights to stage my Fairy Queen’s new abode and welcome her home! (And I know it’s supposedly bad luck to invite a fairy to live inside your home, but we’ve become such pals and I’m trying to convince her to do some household chores. Don’t judge!) 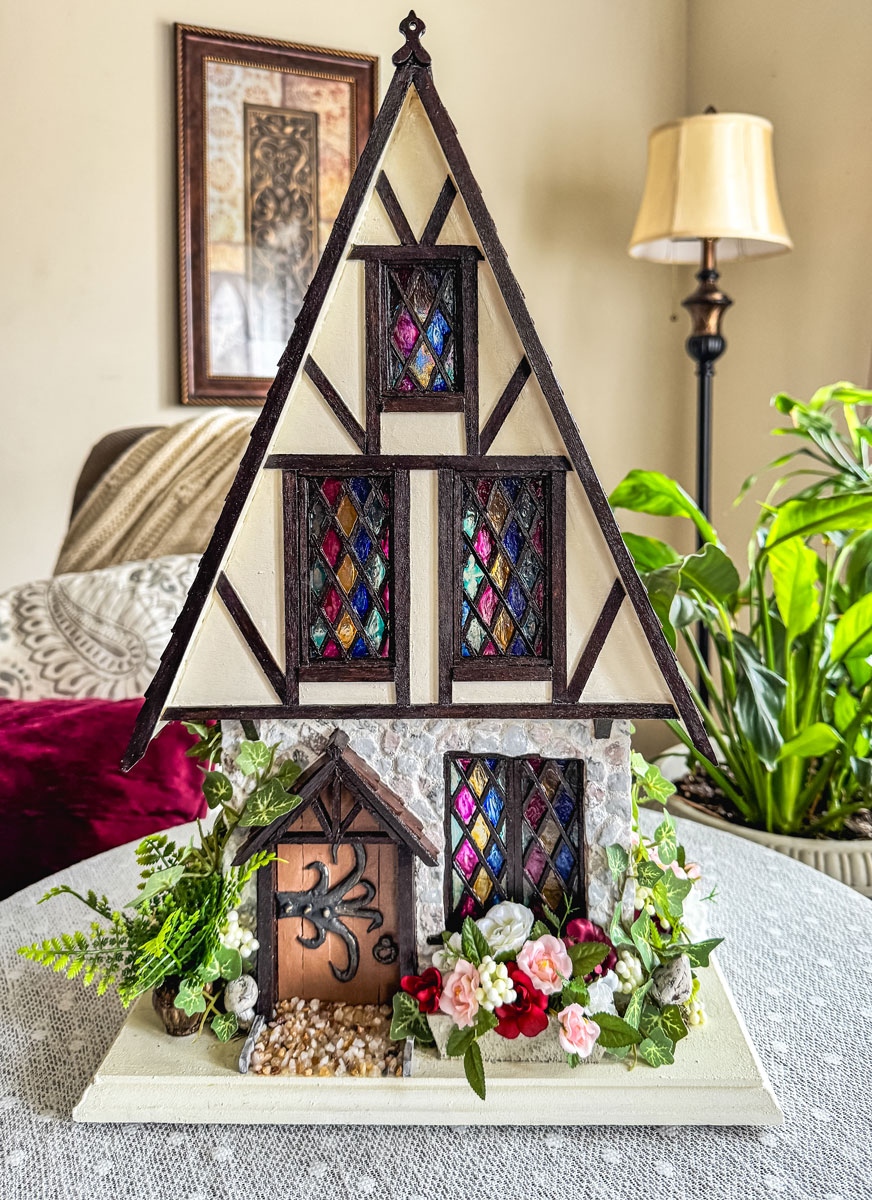 Want to see more? Check out the accompanying video on my YouTube channel or support me on Patreon to view the extended version! And visit disstudiodesigns.com to see more of my whimsical faux floral displays, handcrafted candle holders, magical fairy houses, and Celtic-inspired wood-burned art. Find more blogs like this: DIY Projects blogs Fairy Houses and Gardens blogs Behind the Scenes blogs Project Updates blogs
0 Comments
Leave a Reply. |
Author
Some of the posts on this site contain affiliate links. This means if you click on the link and purchase the item, I will receive an affiliate commission. 
Categories
All
Archives
June 2025
|
 RSS Feed
|
|
Major credit cards accepted through Square. Apple Pay option available. This site also accepts PayPal payments for better online security, and it's free to sign up! Gift cards are now available for purchase!
Copyright 2025 |